Wednesday 29 March 2023

Battle Amongst the Tombs

I had another gaming day up at Bodvoc's where we played a four player game. Bodvoc devised the following scenario.

Battle over the Graves of the ‘Kryndara’

A multi player game of Kings of War using four 750 point ‘Ambush’ armies.

The Kryndara are an ancient people whose burial grounds are occasionally found scattered amongst the many ruins to be found upon the plains of Babdos. As the opposing armies approach each other it is obvious that the battle is going to take place across the ruins of a Kryndaran graveyard. As the armies close upon their foe, they clash over the remains of the graveyard, can they claim some treasure as well as victory?

Deployment: For deployment, place 4 tokens numbered 1-4 in a bag. The players take it in turns to draw a token from the bag. The number drawn indicates their deployment zone and also they will ally with the army deployed adjacent to them. (One long table side was numbered 1 1nd 2, the opposite side was 3 and 4).  Players then throw a d6, deploying their armies in ascending order, so lowest score first (re-throw ties). Figures may be deployed up to 12” in from the table edge. Other terrain will have been placed randomly on the table.

Duration: the battle last 6 turns plus a possible seventh. At the end of the sixth turn throw a d6, score 1,2 or 3 = game over, 4,5 or 6 and play a final seventh turn.

Chapel and Graves: in the centre of the table is a ruined chapel. Also placed along the centre line are 4 old graves, equally spaced. Then throw 2xd6 for a number of inches and a random direction dice for each grave and locate them where the dice indicate.

The ruined chapel is worth 2VP and each grave is worth 1VP.

To claim the chapel or a grave a player must move a unit into contact with it and be the only player with a unit in contact with it at the end of the game. The first player to contact either the crypt or a grave must throw a d6 with the following effect…

1-3: Chapel/grave is empty

4-5: The angry spirit of a long dead Kryndaran attacks the unit/character

Spirit: SP5, Me5+, De4+, Att1, Ne11, if defeated it will shriek and then fade away.

6: Treasure: throw a d6 again… 1,2: a rusty Blade of Slashing (re-roll 1 melee dice)

3,4: A very decorative Staying stone: +1 to Wavering stat

5,6: Onyx Ring: regeneration 4+, once per game.

Any treasures found/claimed are also worth 1xVP.

Players also gain victory points for routing enemy units, scoring 1VP for each point of unit size their routed foe is worth. We will use glass gems to keep score of VP's. The winners of the game are the allies with the most glass gems at the end of the battle.

We randomly drew who fought where and with whom, Bodvoc had his Silvan Kin of course, and he was allied with Phil using the Orcs I recently based. I used my Karpath Kingdoms of Men and was allied with Ian's blue-skined Ice Orcs.
Bodvoc's sylvan Kin.  750 points of shooty nastiness

750 points of Green-skinned meanness 
My 750 points of bold Men of Karpath


Opening Moves
We set up with the two rival Orc tribes facing off against each other, and the Sylvan Kin keen to renew hostilities with the Men of Karpath.

Before the battle starts the Silverbreeze cavalry have claimed one grave.  

The Green-skinned Gore Riders claim one tomb while the Ice Orcs occupy the chapel.
The Ice Orcs advance, claiming another grave, while their green kin wait. Sylvan Kin shooting has already routed the Mounted Scouts 

Clash of the Gore Riders. The Green Orcs were hindered charging through a pond and needed 4+ to hit 

This is the result

Sylvan Kin shooting wavers the Bowmen, slowing down the second Spear Phalanx. Mayster proves singularly ineffective with his Fireball


Mid Battle
The leading Spear Phalanx has fallen to the Sylvan Kin 

The Green Orc Gore Riders use their superior numbers to see off the Ice Orc troop, they turn to face Dennis the Krudger on his gore, Gnasher 

Artem and the Foot Guard charge the elves. Despite causing a lot of damage, the elves hold firm (note that double 1 Nerve test).

Dennis has seen off the opposing Gore Riders

The melee hots up between the men and the elves.  Meanwhile we decide there's something wrong with the Ice Orcs*

Mayster takes moves to investigate one of the graves, but Emyn Lockharn charges him.  The adjusted Ice Orcs turn to face the Sylvan Kin, while their second Krudger tackles Emyn Lockharn

The Orc table half, less action, but tense manoeuvring


End Phase
The Skulks charge their icy brethren in the flank, so the Hunters turn their attention on the Ice Orc Ax  
Emyn flees the melee, but is chased by the Krudger and is hurt badly, and the Hunters fall beneath the Ice Orc axs.  Meanwhile, with Anichka holding off the Forest Shamblers, the Guard are free to charge down the Sylvan Kin standard bearer. Sadly, the General can't rout the Shamblers, despite chopping many branches off. Mayster finally causes some damage with his Fireball, scorching the cavalry, but it's too little too late.

As the battle ends the men of Karpath have suffered badly. The Foot Guard remain, as do all their heroes, but the rest of the army have fled. The Sylvan Kin are reduced to the Silverbreeze Cavalry and the Forest Shamblers, led by a badly wounded Emyn Lockhart.

This was a great fun game, with the opening turns dominated, on my table side at least, by Elven archery.  Once I was able to get to grips with them, they didn't seem so tough, though I had bad luck with the dice, and Bodvoc had better than average rolls.  I was really hampered by the terrain, It forced me to advance one unit wide, and the elves were able to concentrate their archery (11 shots from the Hunters and Emyn, plus 3 from the inevitable Army Standard Bearer with Boomstick, and 7 more from the Silverbreeze Cavalry) where they wished.  Had I been able to present a choice of targets I would no doubt have got more units into contact and the elves would have paid dearly.

The Orc side of the table was a lot less bloody, we suspect that the orcs had actually made a pact to do some half-hearted fighting and we expect future battles between the reduced Sylvan Kin and the Green-skin Orcs, and the men of Karpath and the Ice Orcs.  In actual fact, Phil, commanding my orcs, had never played before, and wanted to watch most of the action.  I'm sure he'll be diving right in next time!

Ultimately, the Syvan Kin/Orc alliance won by 2 victory points, a much closer result that it looked like at the beginning.

You can read Bodvoc's version of events here.

*The Ice Orc problem; due to a mis-communication, and confusion between editions, the Ice Orcs were mixing up troops and regiment sizes.  Although they were stated correctly, there were roughly twice as many Ice Orcs as there should have been.  After readjusting them they seemed a lot less scary to their Green-skinned opponents.


Sunday 26 March 2023

Basing Kings of War Orcs 2

I showed the first two of my new Orc army finally based here. The Trolls and Gore Riders require a slightly different technique because they don't have any bases attached.  These two units are some of the ones I had great basing plans for, but in the end I've gone for the same method as the Goblins I did way back in 2015.
Regiments of Gore Riders and Trolls

Essentially I textured and decorated the bases before adding the magnetic sheet, then pinned and glued the minis in place. I used the same style of ruined stonework and the same gloop as the Skulks and Ax units.  I wasn't sure what to add to the bases, but I found a nice bit of cornicing in my collection of ex fish tank ornaments which looked just right for a troll to stand on.  The pavement on the Gore Riders base was inspired by some of the ruins dotted around Hyrule in Breath of the Wild.
Bases textured and decorated ready for the minis

If you're pinning minis on bases it's good practice to drill straight through the base from the top. Sand the bottom flat again, then countersink the underside.  Simply use a much bigger drill bit, the end should be good enough for countersinking.  You don't want to go too deep here, just about 1mm (ish).  I find that the drill bit can be twisted just using my fingers - all you are doing is slightly enlarging the hole. This allows you to trim the wire off neatly flush with the base and avoid nasty sharp ends sticking out. It also means you can drop a bit of superglue into the hole to help keep the pins secure.  You'll probably have to sand it lightly again before adding the magnetic sheet to bring any superglue level with the base. 

Underside of trolls' base showing countersunk holes filled with superglue

I added the static grass after the minis were glued in place, partly so I could cover any messy areas with vegetation. I used the same colours as the two previous units here, and again tried to show the grass becoming less healthy as the army tramples over it.


If you missed me painting these units you can find the trolls here, and the Gore Riders here.

Tame the Beast - MESBG Battle Companies Game 3

We just finished our third game, and it was great fun, if short. We rolled Tame The Beast, where both Battle Companies are trying to slay a rampaging Cave Troll*. There are some nice benefits for the Troll slayer and their warband.

We both have heroes suffering from Old Battle Wounds, but both were well enough to fight.

Both Battle Companies face off, warily eyeing the Troll

A Dol Amroth pike block advances while the Haradrim form a loose line to contain it. The Troll has already taken wounds from both sides' archery, and Sayaad has shot the Blackroot Vale sergeant

The Troll charges Qayid. One of the spearmen is too scared to help, but another one joins sergeant Shawish in melee.
The Troll is victorious, taking out the bold spearman (Tise in his first engagement) and nearly killing Qayid (a lucky Fate roll saved him)

Both sides pile in against the Troll, but before the melee begins a lucky shot from Sayaad fells the beast

This was an amazingly fun game, and proof that good scenarios really make a difference.  I was certainly lucky with my dice rolling, even losing Priority for all but the last turn helped, as I was able to move the Troll towards my Battle Company (though it is an absolute beast in melee, costing me a warrior and nearly my Leader, but for a Fate roll). The best rolling had to be the sergeant's shot against the Troll, needing to hit (a 6), then avoid hitting any friends (another 6!) and finally needing a 6 to cause the final wound on the Troll.

Post battle neither of us lost any troops, though my son very unluckily rolled an arm wound for his Blackroot Vale sergeant. He did gain some abilities, but these are of limited use to a one armed archer.  Adding insult to injury, his one reinforcement roll turned up nothing.
My leader Qayid is now a Master of Poisons, Sayaad has both Point Blank Shot (which merely replicates his poisoned arrows) and is a Master Shot, allowing him to shoot twice in the Shooting Phase. Very nice. I did have one warrior who rolled for promotion, but didn't get anything, never mind.  I ended up with 6 Influence Dice, which I spent to roll two warriors with bows. My Battle Company is now ten strong, five bowmen and five spearmen, and both and are a bit better.

I'm looking forward to the next game, but I must get some more minis painted.
The Fiefdoms have to decide if they should retire the one armed sergeant. On the one hand, he gained an extra point of Might, and still has some use, especially calling Heroic Actions, on the other hand, he can't shoot any more, and is a lot of points. Retiring him would certainly give the Fiefdoms an underdog bonus, which could be very helpful.

*I couldn't find my Cave Trolls, so an undercoated Mordor Troll stood in for it. We kept the Cave Troll stats.


Thursday 23 March 2023

Secure the Gauntlet - MESBG Battle Companies Game 2

We played the second game in our Battle Companies campaign recently.
There was a chance that my leader, Qayid, would be absent due to his old battle wound, but fortunately he was ok to fight.
We rolled Secure the Area and used a treasure token depicting a magical gauntlet (hence the name we gave the game).

This scenario has an interesting set up, each model rolls to turn up on a random table edge.  This leads to battle companies being spread out and separated, though you have choice where on a table edge they deploy.
My Haradrim deploy along the centre of the near table edge and in the top right corner.  The Fiefdoms are high-ish up the right table edge and in the top left corner (off the photo)

Qayid leads a spearman through the woods to try and ambush the Fiefdoms troops, having lost Sayaad (one of the sergeants) to a lucky shot early in the game.

Haradrim attempt to hold a strongpoint in the ruins, hopefully close enough to the objective for a last minute dash.

The fight near the wood hots up, and the Blackroot Vale archer behind the wall picks of Haradrim.  the Knight, safe in his amour, takes on the Haradrim in the ruins.

Shawish, the other Harad sergeant tries to make it to the fight in time

One Pikeman and one Spearman down

The Knight calmly finishes off the archer

At this point my battle company was broken, and Qayid, sensing the way things were going, fled.  The game ended after this turn

One of the Blackroot Vale archers had moved up close enough to the gauntlet to claim victory.

This was another fun game.  The random nature of deployment meant that it was harder for me to bring my superior numbers to bear, and I completely failed to either play the scenario (I was worried that superior Fiefdoms archery would have stopped me claiming the prize) or coordinate any concerted attack.  This is something I'm going to have to work at.

The Knight is now even better at fighting, and one of the Archers can shoot better.  I gained one reinforcement (a spear armed warrior), but lost one of my bowmen, so I'm still at eight minis, and I'd better get another spearman painted.
So far the campaign is great fun, I'm looking forward to the next game.  I'm pretty much guaranteed some advancement after the next game, and I might even gain an 'underdog bonus' so I may get another reinforcement roll.
I have another spearman to paint, actually, I've got four more minis in the process of being painted.  I'm also assembling a terrain box for our Middle Earth games, though the tower has slipped through a rift from Hyrule.  I aim to add some more trees to the collection, and some ruins and areas of broken ground.

Saturday 18 March 2023

Basing Kings of War Orcs

A long time ago (2020) I painted up 750 points of Mantic Orcs with the intention of putting together a starter set. It was also a project that gave me targets when I was struggling with motivation during lockdown.
I never got more than the Brock Riders painted for the opposing Dwarf force, and none of the Orcs got based as I was keen to try a couple of ideas for this, none of which worked.  You can see the Skulks here and the Ax here .

Recent work on my Kingdoms of Men Ambush force persuaded me to dig them out and finish them off. Back then I promised that basing would get it's own post (partly because I wanted to astound you all with my cleverness). So here it finally is. Me basing up a  troop of Orc Skulks and a regiment of Orc Ax.

The Bases
I try to have a few Kings of War unit bases ready. I cut them to size out of 4mm MDF, sand the edges (I like to chamfer them slightly round the top edge). Remember, the dust from MDF is a health risk, so wear a mask, work outside etc. Then I seal the MDF with sealant to both protect the cut edges and reduce the chance of moisture warping the material. I then apply magnetic sheeting to the base and paint the whole lot with Burnt Umber craft paint.

Theme for Decoration
My original Orc army had a ruined city theme. I used various bits of broken fish tank ornaments for pillars and walls, with the rest of the ground cover being mostly bare earth with a few grassy patches. Although I plan to revisit this army and repair and rebase it, I still like the theme. 
This time I'm going to create most of my own ruins with XPS foam. So I mocked up each base using blutac to fix the minis in place temporarily.  I'm using less than Full Model Count, usually sixteen for a regiment, so I should have some space for extra decoration.

Planning
I used some random foam blocks to delineate areas of ruins and came up with a set-up I liked. I then pencilled around the bases sufficiently to show where each mini would go. Then using some of the smaller blocks of foam I cut for the ruined walls here, I built little wall sections.  The foam was stuck down with Mod-Podge, simply because it was close to hand.
I then removed the minis individually, numbering each on the base.  This gave me access to the ruins for painting.
Ax regiment mocked up with some XPS blocks. Too big, but it shows me where ruins will look good 

The Skulks squeezing between their 'ruins'

Ready for painting. I found a bit of a column from my earlier army to replace the blocks on one side, and added some 'stones' along the front

Painting the Ruins
The first stage was a coat of thinned Mod-Podge and paint, in this case Vallejo Extra Opaque Charcoal Grey. Once dry it was simply a case of drybrushing with and. I resisted the temptation to do too much, such as staining; the minis are the focus here.
Both bases with painted ruins

Adding Texture (and Minis) - The Gloop*
Once the ruins were finished it's on with adding the texture.  This needs to be a thick enough layer to hide the circular bases on the minis, and provide some texture.  I make this 'gloop' with filler (spackle in the U.S.) mixed with some PVA glue and burnt umber paint.  The proportions are about two thirds the amount of glue to filler, measured by eye, and enough paint to colour the gloop.  I also add a bit of sand and fine grit to give a grainier texture to the finish.  
The fiddly bit is applying this when the minis themselves get in the way.  The answer is to glue a few minis in place, then texture round them, then some more, and so on.

Using the Skulks as an example, I painted a bit of the gloop on each mini base before gluing, this makes it easier to avoid covering the mini itself.  I glued two minis down at once; superglue is ideal for this.  Then I applied  small dollops of gloop around the mini bases with a modelling tool and used an old brush to smoosh it into place.

First two Skulks glued in place and 'glooped'

The gloop smooshed around the pillar

With the first rank done I started the back rank


Finished - front view

and back view

Before it dries, I like to sprinkle a bit more sand and grit onto the gloop to add a bit more texture.

Finishing Touches
The textured surface can be drybrushed, but if you're going to add a lot of static grass or similar there's not much point.  For these units I lightly drybrushed VGC Khaki in patches.  I also painted the bits of grit in VEO Charcoal, then drybrushed it to match the stonework.

Once any painting is dry I added static grass.  My first Orc army had very little grass on the bases, they are marching through a ruined cityscape after all.  My recent Kingdoms of Men army has a lot as I want to emphasise the richness of their lands.  For these I went a bit heavier on the static grass, but since I'm pocking a glue laden brush in between my nicely painted minis, less is often more.  I tried to have more greener grass at the front of the unit, getting sparser and darker towards the rear.  The mere presence of these evil creatures harms the natural world.
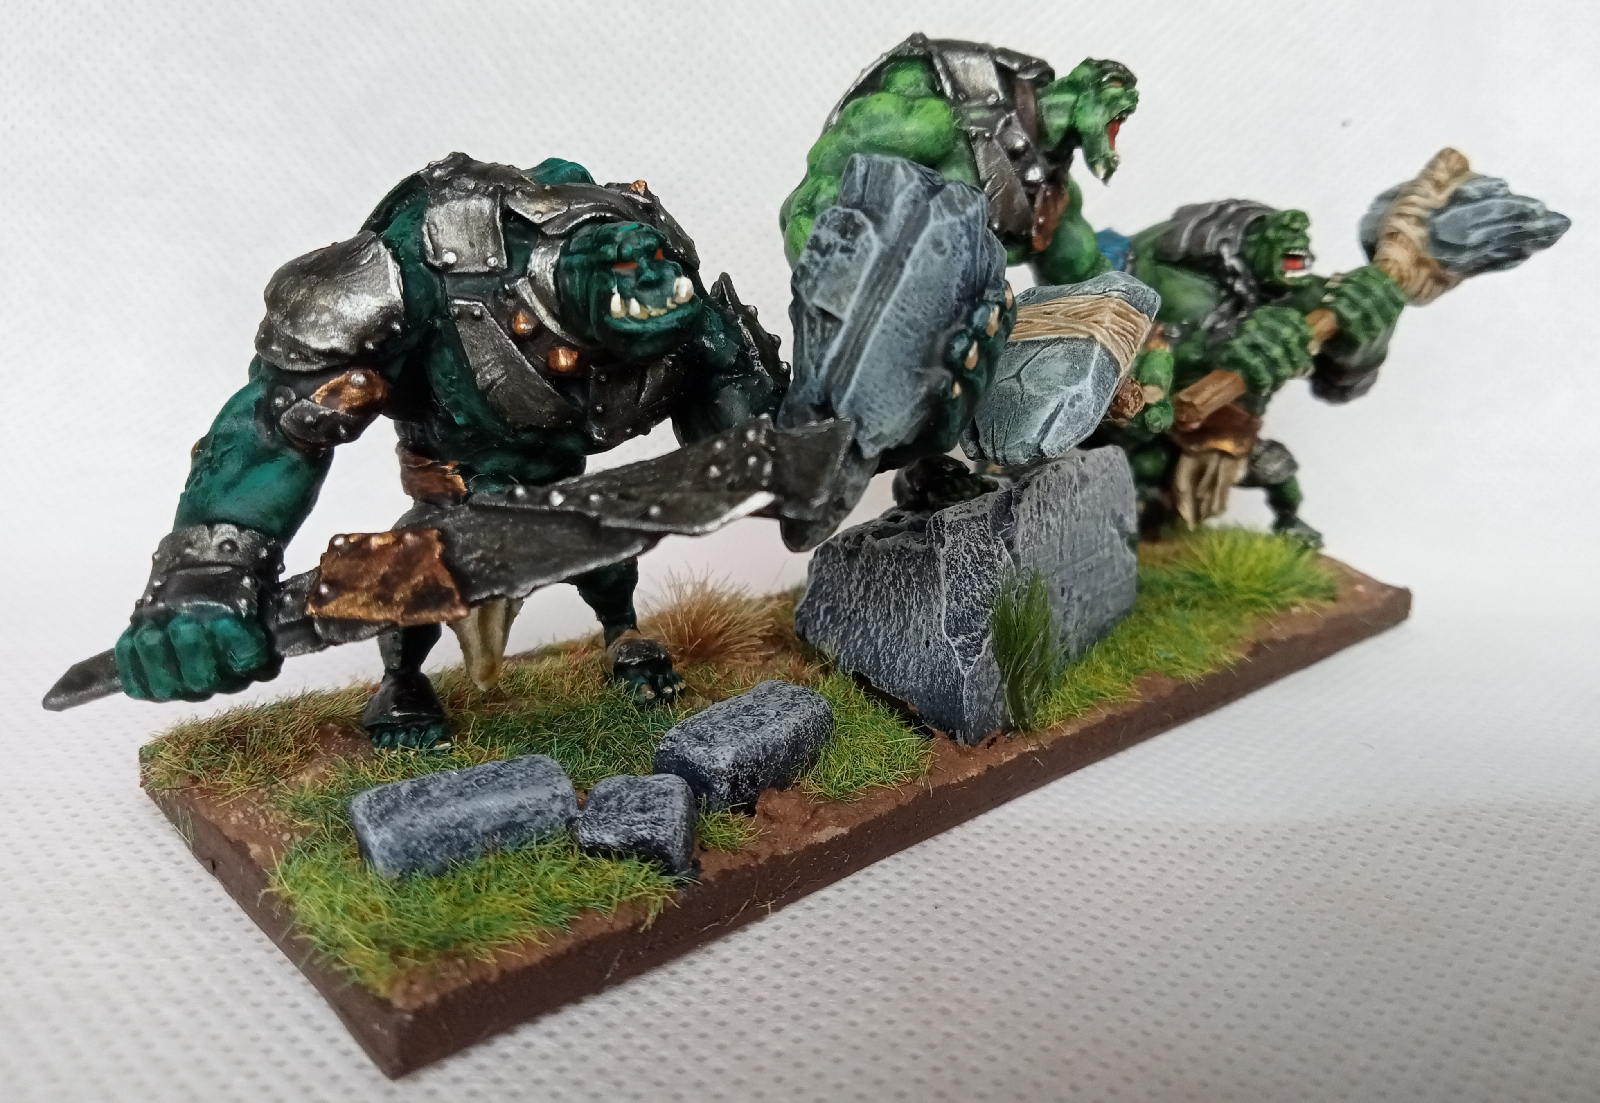
The finished Skulks


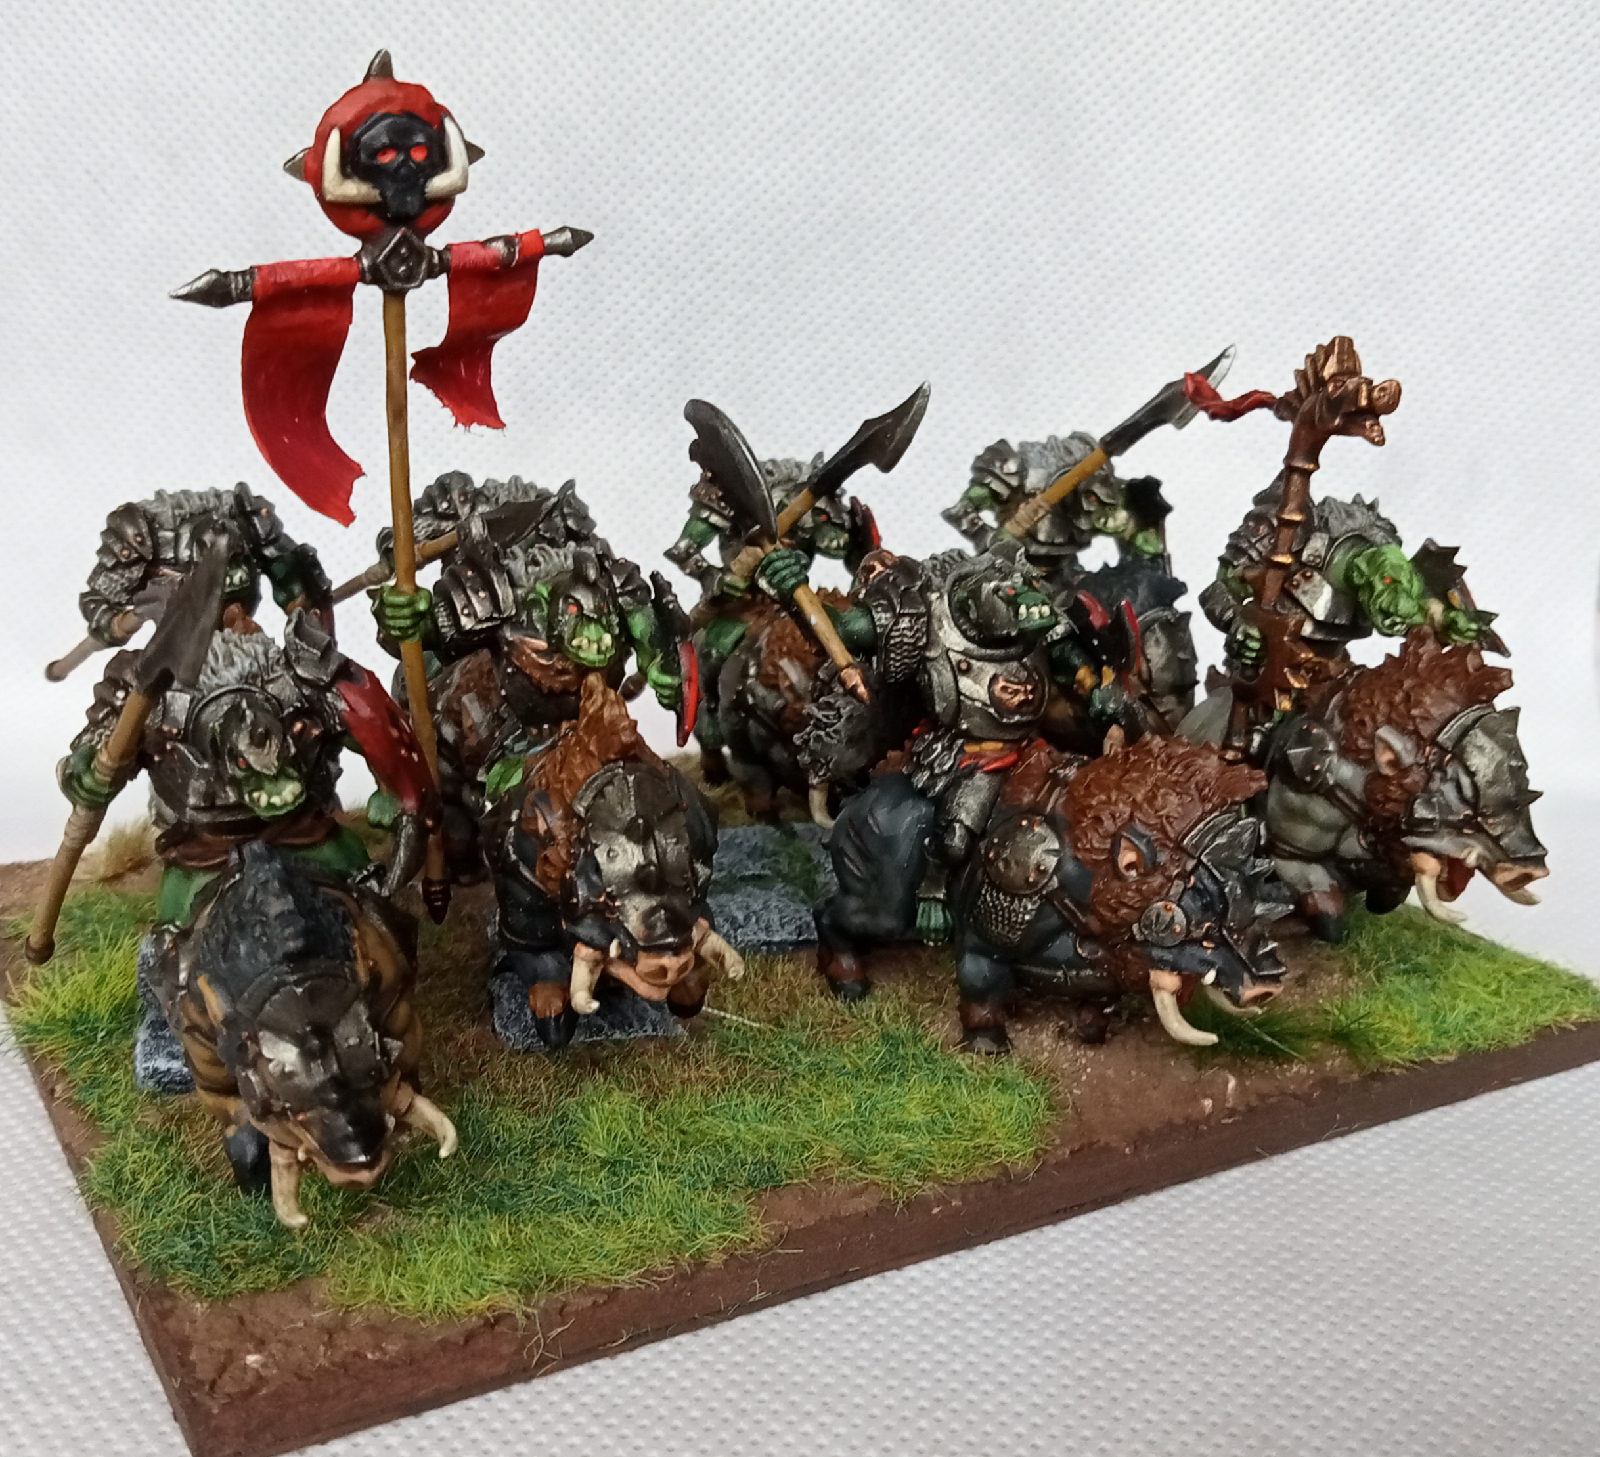
And here's the regiment of Ax.


It's good to finally get these based and ready for play.  I'm going to have to do the Gore Riders and Trolls slightly differently as their minis don't have integral bases.  I'll make the bases up then pin the minis in place.

*Mel the Terrain Tutor uses the term Gloop for his various pastes and mixes and it seems appropriate.  I suppose it derives from gloopy.   I'm sure it has nothing to do with The Gloop, a coastal feature in Orkney, though that is worth a visit if you are in the area.