Showing posts with label terrain. Show all posts

Friday, 10 July 2026

Season of Scenery 26: The Masterforge, Planning and Progress

Warning: this is another one of my long rambling posts where I go through various options and choices prior to actually doing anything. Hopefully it's interesting to the reader, it's certainly useful for me.

A Bit of Background 
The online D&D campaign is currently set around the Dawnforge Mountains, site of Nentir Vale's largest settlement, the dwarven city of Hammerfast. 
Back in 2010 WotC released a sourcebook covering the city and the region, incidentally mentioning three further dwarven settlements and various adventure sites.  One of these was my original plan for the session, but various side quests and distractions mean that the focus is still very much on the dwarven side of things, the Valley will have to wait.
I've taken one of those settlements, Highpeak, and developed it to tie in with Tharnak Thunderforge's (dwarven paladin of Kord) background. The heroes are seeking the ancient forge of the Thunderforge clan and are attempting to reclaim it, hopefully discover more of its history and uncover the truth behind disquieting rumours about the clan.

The Master Forge 
The forge is multi level, in fact the party have already explored a couple of them. Some areas have walkways, giving the potential for 3D encounters, and there's plenty of smithing type equipment lying around.
Initially I'll focus on the large ground floor room with the walkways as being a good place for action, and the space that translates least well to a 2D floorplan.
If time allows, I'll expand further to other levels.

How to Build an Arcane Forge
The Crypt of the Vampire Knight used Crooked Staff's Dungeon in a Box, with a few additions. It's a great system, and has lots of uses beyond the adventure. 
The Master Forge, however, is quite specific, and is unlikely to be used beyond this adventure. 
I much prefer multiple use terrain so I'm hoping to keep this build pretty simple; no point in putting a lot of effort in for one game (yeah, right).

I'm was going to use some of the Crooked Staff Print and Paste terrain; it's quick to build and produces a pretty sturdy result. It also uses mostly scrap materials (apart from printing off the textures and standard hobby consumables such as glue), and Kris has recently done some very nice dwarven textures.

But then I remembered that I already have Fat Dragon's Halls of the Dwarven King EZ Lock set*.
I've used Fat Dragon stuff in the past, most notably for the Lost Library (a truly epic build, if I do say so myself), but I found the thin card construction was prone to damage and the whole thing was fiddly to assemble and used quite a bit of white card for printing. 

If only there was a way to combine the two???

Of course there is; it's easy. 
Simply print off the Fat Dragon textures on paper, cut out the bits (ignoring any tabs etc), then proceed using Kris's method of corrugated cardboard and cereal box card.
The end result is much more robust than the original Fat Dragon builds, and quicker too.
I do need to get a bit neater with the hot glue gun though.

Once I got going, I got quite inventive with the textures, and even used some Crooked Staff stuff (Episode 51, Broken Wooden Floors) to build the ramps that connect some of the floors.

Current Progress with Spoilers
(While I don't think there's too much sensitive stuff here for the players, there will inevitably be stuff that you might rather be surprised by. I'll try and keep any spoilers to a minimum).

I've got the basic floor plans of four of the levels done now. There's still the walls (which will be removable for ease of play), should I decide to do them and if time allows, and a few more pillars and steps.
I also want to make some bits and pieces to help show the purpose of the building; benches, tubs or carts of raw materials, possibly an anvil or two, if I get as far as the Crafting Level. 

The furnace, heart of the structure, is also important, hence the following...

A Pringles tube and the contents bagged up
True crafters want the container, not the contents 


The tube plus varioous printed out sheets of 'Dwarven' stone texture, cardboard circles and various other tools and bits
Textures ready for application,  plus a few other bits and pieces 

Tube cut down to size and resting on an octagonal base
The furnace takes shape

I toyed with various designs for the furnace. There's a rather nice one in the Dungeons of the Mountain King set, octagonal in section**, but I wanted something bigger. My original map on Dungeon Scrawl has a round icon about fifteen (scale) feet in diameter. That's three inches; roughly the diameter of a Pringles can! I'm not personally a fan of the contents, but they're slowly being eaten. 
Then it's just a case of applying suitably dwarven textures and some greebles to indicate some sort of functionality and control.

Hopefully I'll get enough built for the game.  There'll be a report on here afterwards, and I'll share pictures of the finished forge afterwards.

What's Next?
Well I've also been assembling minis for the game, though there seems to be less required than last time, and many of those are already painted.  
Scenery-wise, there's still a good chunk of time left in the challenge, so I might take the opportunity to finish some stuff off.

*Fat Dragon Footnote
I haven't linked to Fat Dragon's stuff.  I do like to do this as I believe that we in the hobbysphere can help promote buisnesses that we find useful.
However, Fat Dragon no longer produce 3D card terrain sets, having moved over to 3D printing quite some time ago.  
I've nothing against 3D printing, but I don't think I'll ever invest in one.  I note that they now do files for printing some of the Halls of the Dwarven King set, those dwarven statues look great!
They still sell files from printing off 2D paper tiles (Copper Dragon), which are worth a look, though there are quite a few other options for this, the 3D card stuff was far harder to find back then.

P.S. if anyone can find links to legitimate sources for this stuff, I'll happily add them here.

**Dwarves love octagons.  Peter Jackson taught us that (or rather Alan Lee did)


Tuesday, 3 March 2026

Scatter Terrain Bushes

Rangers of Shadow Deep Mission Two (among others) calls for a good amount of cover and suggests boulders and bushes. 
I used Dave Stone's Paint What You Got Challenge to prepare the stuff for this mission, but as I got on to the terrain, time was running out, so the cover had to be quick and simple.

Nine various size bushes with a Ranger and a Gnoll for scale.  The bushes are a bit 'cartoony', but do the job
The new shrubbery 

Construction; Basic Shapes and Texture 
A while ago Grim gave me some spongy packing foam, not the really soft stuff used for storing minis, nor expanded polystyrene - this is fairly rigid, but still flexible enough that it shouldn't damage easily. It cuts easily with knife or scissors so I cut some to vaguely blob like bush shapes.

To add extra weight I inserted random screws in the base of the bush shape. The foam is soft enough that this can be done just by twisting and pushing with fingers.

I used hot glue to fix them on to foam board bases (the plastic stuff used for signs, not the XPS/card sandwich I use for buildings). In some cases I hot glued extra bits of foam on top to give a more rounded shape. 
Two rounded blobs of black foam on white bases
The basic structure 

The bush shapes were then coated with PVA glue and covered with dark coarse turf. I used a combination of scattering it over and pushing it on to the glue on the shapes to get full coverage.

Sealing the Texture 
Left on it's own, the turf texture would quickly rub off, so the bushes were sprayed with isopropanol and then watered down Mod-podge was dripped on to seal everything in (in theory). This takes a while to fully dry, I might save any more for the Season of Scenery Challenge in summer.

At this stage I also added a sprinkle of lighter coloured turf to add some variety to some of the bushes. 

Several bushes with the turf added.  They've been soaked in the sealant and dye from the turf has run out. Some of the bushes have lighter turf sprinkled on to give a bit more interest and variety
The sealing stage = messy

Once everything was dry, a quick burnt umber to neaten the bases and done. 

They are very simple, but they do the job. I'll certainly make some more, they're great for skirmish games like Rangers of Shadow Deep, and I suspect they'll turn up in Middle Earth as well.

Once I've a large number done I might add a bit more detail, such as extra texture on the bases, and perhaps a bit of drybrushing to highlight the foliage. 

Green Fingers 
A note of warning. I used cheap turf - entirely appropriate for this low budget project - but the dye used isn't fast. It runs when wet, especially when sprayed with isopropanol and slathered with watered down Mod-podge. You can see the runoff on the photo above. 

If you're tempted to make some yourself, either buy dye-fast turf or put plenty of paper down, including a top sheet of baking parchment (otherwise the bushes will just stick to the surface). Once the Mod-podge dries, it should be protected from further moisture and resistant to shedding the flock.


Sunday, 1 March 2026

Paint What You Got Challenge 25/26 Roundup

Well that's Dave Stone's Paint What You Got Challenge over with until December. 
I set myself a couple of goals: paint the minis for the second Rangers of Shadow Deep mission and paint the minis for the Middle Earth Strategy Battle Game storybook Fellowship of the Ring,  or at least the first half. I did a breakdown of the requirements in December if you're interested. 

How Did it Go?
I'll confess that I didn't manage everything, but I did manage a lot of it. Let's have a look at what I did manage. 

Rangers of Shadow Deep Mission Two 
I assembled (taking advantage of Anne's 2026 Miniature  Assembly Challenge for extra impetus) and painted 15 plastic gnolls, 1 metal gnoll Shaman and a kitbashed Ranger and a Reaper Bones Vulture. 

Teh gnolls all have a red hood or at least a red eyepatch.  skin/fur is a light tan, with dark brown 'mane'.  clothing is a mish-mash of different colours, although the shaman has a black robe. he also has lots of skulls (though no where near GW standard)
Gnoll sergeants, shaman and vulture

Rear view of same. The red wing tips on the vulture are visible
The gnoll 'staff'

Six gnolls with hnd weapons and shields. Again, multi coloured clothing. Fur/skin tones as before
The Warriors
Rear view of same
Six gnolls running away?

four gnolls with bows and two with crossbows.  Equipment and fur etc as standard
Gnoll archers
Another rear view of some gnolls
'Dum-de-dum-de-dum-de-dum'

The gnolls go together pretty well, and bits from other Frostgrave kits can be used, as I did with the great axe for one of the sergeants.  If/when I build the remaining sprue, there's a two handed hammer on the Barbarians sprue that I think I'll use.  
While they were fun to paint, I regret making the decision early on to use as many different colours on the cloth as I could.  

Kitbashed ranger with long green cloak, leather jerkin over dark yellow shirt and grey fur 'skirt' and dark grey trousers.  He has a helmet and is holding a sword raised in his right hand and a bow in his left.
Another Ranger (of the Shadow Deep)
Rear view of same
Kitbashed from many sources
The ranger is made up from bits from the Frostgrave Barbarians sprue and the Oathmark Human Infantry sprue, with the scabbard from the Light Infantry set.

I also painted a couple of resin tents and a resin piece with fallen lög, shields, backpacks etc. for the gnolls' camp. These are from Scotia Grendel; nice models, if, perhaps, not quite 'gnollish'.

The campsite

Nine homemade bushes for the first scenario in Mission two.  These were a quick build, there's a full description coming sometime soon.

Nine bushes, roundish shapes ranging from around chest height on a mini, to considerably taller than a mini.  They are basically 'fuzzy' green blobs
Ranger and gnoll hide and seek among the shrubbery

The second scenario requires a lot of scatter terrain for the inside of the tower.  Here's a start, but I'll need a lot more.

The crates and the board use Crooked Staff Print and Paste textures; the Build Along Dungeon for the floor textures and 19; Chests and Crates for the crates.  There are many similar products available; I like the Crooked Staff stuff as its cheap (Build Along dungeon 1 is, I believe, free, and the rest are pay what you want) easy to make and generally relatively low on ink use and I like the art style. 
I may print off some more floor texture and base the crates in small groups once I've built some more. 

Fellowship of the Ring Journeybook 
This was the big disappointment.  I managed two Rangers of the North, that's all. These took a lot longer to convert than I anticipated, it's my own fault for being too fussy (or too tight to buy the actual minis). 
I enjoyed building and painting them, and I'll continue with them, but possibly with a more realistic timescale. Once I have enough finished, I'll do a post discussing how I make them, and possibly why I bother. 
And yes, I know the bases are untextured; I'll do all nine at once when they are finished.

Two cloaked, bow armed rangers.
Two Rangers of the North

Each ranger has a backpack
"Shadow Deep? What's that?"


Hints and Mysteries
In my last post I suggested that I had a unit painted for my undead that I was keeping secret.  Well, on closer inspection, I haven't finished the shields, so you can rest easy on that front Dave.

Challenging Fun 
Once again I really enjoyed taking part in the challenge and thanks to Dave Stone for all the work he puts in to organising this and the Season of Scenery challenges every year.
If I didn't finish everything I wanted to, it's my own fault for either being too ambitious or too distracted, especially as I've had a lot of rehearsals to fit in as well for April concerts.

What's Next?
I'll continue to prepare stuff for Mission Two, and I want to get more MESBG stuff done, but I promised something new for March, so expect some Deep Space action soon.

Thursday, 26 February 2026

Paint What You Got Challenge 25/26 - Photo Finish

Today's the final day of Dave Stone's Paint What You Got Challenge and, while I haven't finished everything I planned back in December, I've got to a straight edge, so I'm calling it done.  

This is what I've managed to get painted in the time allowed.

Terrain and minis, mostly for RoSD (details in later posts)
The Finished Haul

I'll do a longer post soon, discussing the minis, but for now, here's a photo showing it all*

*Actually, there is more. I've got a unit done for my undead for Bodvoc's Dark Shadows campaign, but I'm keeping them a secret for now.

Wednesday, 26 November 2025

Scatter Terrain for Skirmish Games

At the start of the year I used the Paint What You Got Challenge as an opportunity to prepare for the first Rangers of Shadow Deep mission. This was mostly building, kitbashing and painting minis, but I did want to add to my terrain collection as well.  I managed to finish five Nest Trees, but there were several other bits that weren't quite finished. 
They were all built and painted by the end of March, but I couldn't decide how I wanted to base them. Long time readers of the blog will recognise this as a common fault in my hobbying, especially with regard to terrain.

Other things got in the way, of course, but I've just got around to finishing these three pieces.

Three bases of rocky terrain.  A set of rock spires in a pale grey with brownish tones, a low squarish boulder and a craggy tor like collection of three different height rocks.  The later two are a darker grey, but again with brownish tones
The three rocky bases

The same from a different angle, showing some of the smaller rocks around the base of the tor
A different angle

Rocks
Many skirmish games benefit from cover, and rocks and boulders are one possibility (they are a big part of many Rangers of Shadow Deep scenarios).  These were simple to make, just carved scraps of XPS textured with a ball of foil.  I'm experimenting with different forms and colours, as I plan on making more of these.  Each piece has a slightly different function in game;
Boulder  This is the simplest; a big rock that provides cover and acts as an obstacle.  The colour scheme is similar to the Tors, classic wargamers grey rock. This, and the tor, was designed to allow minis to be placed on the rocks.
Rock Tor  This blocks line of sight or provides cover.  It can be climbed over, and minis can be placed on it.  The form and colour was loosely based on the gritstone formations found locally, though those tend to be darker, thanks to a couple of hundred years of industrial pollution.
Rock Spires  These block line of sight and can't be crossed, at least by creatures limited to surface movement.  I painted them a lighter sandy colour not so obvious on the photos, possibly influenced by vague memories of Bryce Canyon.

Back to Bases
For years I simply stuck terrain on to MDF, prior to that I used hardboard, which is even more prone to warping than MDF, and in the early years, just cardboard.
Fairly recently I discovered foam board (NOT the XPS sandwiched by thin card stuff). Waterproof, so it's much less likely to warp, and very easy to cut. This is now my basing material of choice, at least until I discover something better.

To texture, I used to use sand and paint, latterly with static grass and tufts to finish off. But this gives a fairly uninteresting result. 
I've seen some great terrain and basing, for instance, this Middle Earth themed set from Microforge Minis; if I can achieve something like that, I'll be more than happy.
A lot of hobbyists use dried, baked soil, but round here this tends to be quite dark, almost black. To match my mini bases I want something more traditionally brown. I'd like to grab some of the lovely rich brown soils from the Vale of York, but so far I've not got round to it. 
Failing that, I've been collecting dried tea leaves (loose tea*, as it has a nice granulated texture) and dried coffee grounds. 
There are potential issues with using these; they can go mouldy, but I've dried and baked them thoroughly first, and I plan on sealing them well, so no additional moisture or air should contact them. 
Fingers crossed, this should work.

The Answer's in the Soil
For my first try (the individual rock) I mixed up some brown grouting powder with dried tea and coffee in roughly 2:1:1 proportions. I found that the pale grout was by far the dominant colour, so mixed in a bit more of the coffee. 
The base was given a coat of Mod Podge and the mix sprinkled over, making sure that everywhere was covered.
For the other two pieces I applied patches of tea and coffee to parts of the base; this bit of variety in colour and texture gives a much more interesting and realistic look.  I then filled round with the grout and scattered some over the tea and coffee to blend them more into the ground.

Seal of Approval 
Once the Mod Podge was well on the way to drying, I gave the base a spray of isopropanol. This helps break surface tension and allows the sealant to soak in to the ground texture.
The sealant is simply watered down Mod Podge, a 1:1 mix, though a bit more water won't harm. When I'm doing this stage with minis bases I just dollop it on with a brush, but on a larger bases like these, a dropper or syringe is much better, and doesn't disturb the carefully piled clumps of foliage in the second seal stage (see below).
Unlike just PVA glue, the Mod Podge contains a resin. It's this that I hope will protect the tea and coffee from moisture, as well as making sure that the texture stays on the base.

Green Fingers 
With the soil firmly in place, I added some Fine Turf. I clumped this around the base of the rocks to look like low bushes. I also added some static grass in several different colours and lengths, and finally a few tufts (including some 'flowers').
The vegetation was then sealed in just like the ground texture.

The three rocky bases with minis to show scale.  The lower rocks will provide cover and the taller bits block line of sight
Rangers explore the rocky borders of Alladore

Finally 
So that's three small pieces of terrain.
It might not look like much, but it's important because I've now got a method I'm happy with. I've several more pieces of terrain just waiting for basing, and plenty more that I want to build, such as the Bogel's Farm. 
Now I can get these done and maybe, perhaps, end up with a box of terrain that I'm happy with.

*In this case Rington's Breakfast Tea, though of course other teas are available. It's very tasty though.

** Unless, of course, it all goes mouldy in a few months, in which case it's back to square one.

Friday, 29 August 2025

Season of Scenery Summary

If you're a regular reader, you'll know that I combined my Dungeons and Dragons Eight Week Project with Dave Stone's Season of Scenery Challenge
Now with the eight weeks over and the game played, and with the end of August looming,  what did I get done scenery wise?
You can see most of the stuff in the Crypt of the Vampire Knight posts, but here's a bit more detail. 

Sticking to the Plan?
I did work out a bit of a plan, well more of a wish list really. Did it hold up?
Sort of. 

By the time I got around to doing the scenery I'd pretty much decided what the adventure was going to be so I could be a bit more focused.  I was building only the scenery that I knew I'd use, so I could put a bit more time and effort in to it.

Tombs
For speed (and because I really like them)  I used the Crooked Staff Terrain Print and Play Effigy Tombs.  To add variety I made a couple of different effigies,  and I made several tombs just with decorative slabs from Episode 5s Crypts and Tombs. These are probably the tombs of lesser knights of the Order. NB  the middle effigy in the picture below is deliberately incomplete.  It represents a new tomb (the previous Knight Commander) and hasn't been finished.  I see that the one on the right with the axe is missing its arms, this is an oversight. And there's a happy accident.  The first print I did had greyscale switched on, and it gives a pleasing dark grey texture.  Further,  the jar texture now gives a good extra texture for more tombs.


Six round pillars with fluted decoration (printed on, not 3D) and three tombs with effigies of knights
Three sample effigy tombs and six pillars
Altars
Essentially the same as the tombs.  I built them a bit smaller and had planned to add some sort of decorative element to indicate which god they were dedicated to.  This never got done, partly because I wasn't quite sure how to show this.  The blank altars worked perfectly well though. 
I used the textures from the pillars PDF, leading to...

Pillars
I built six of those, using Crooked Staff Terrain Print and Paste Dungeon Pillars.  They didn't actually get used in the game.  If there had been significant play in the main crypts, they'd definitely have been used.  
There absolutely should be pillars in the main temple, but I never put them in on the virtual map, so didn't want them suddenly to appear.

Rubble
I had a couple of ideas for the rubble, but in the end, I didn't make any at all. There's quite a bit of rubble in the temple, but this was just drawn on the floor plan. 
I did put some Terrain Crate rubble in my box, just in case, but it was already mostly painted, so doesn't really count for the challenge. 

Floor Plans and Tiles 
Initially I planned to draw out Floor Plans on Spot and Cross paper as required.  It's much better to have these prepared ahead of time, so I drew some out back in July. 
I drew them pretty much based on Chris Perkins' method (Mystic Arts has a good video explaining this if you can't find the original article). 
I drew out the Temple, which got used for the fight with the gargoyles, with the addition of the 3D altars, and the crypts below, which didn't see play. 
The temple map is pretty much taken from the original adventure, but the crypts are my own design, though they do incorporate elements from the pack.

But for the actual crypt I wanted something a bit more dramatic. 
I saw Crooked Staff's Dungeon in a Box and it looked impressive. I knew I could do something with it,  and it fits my brief of making stuff with multiple uses. I quickly downloaded the PDF and made my own set. 

But the largely square rooms didn't quite give me what I wanted,  so I looked at the 2D dungeons PDFs. Ideal.  Very easy to convert to the new style of 3D tiles,  and I've got the wide hallways I wanted. I also made some smaller doors using a texture I found on one of the bonus PDFs.

Stairs lead down to a 6 by 6 room with a statue in the centre.  A door leads to a 4 by 4 room containing a tomb with an effigy of a knight and two other doors lead to smaller rooms with less grand tombs.  A secret door leads to a corridor, at the end of which a door leads to a long wide room with an annex at the far end.  Green flamed braziers light the first section and the far end holds a tomb.  Another secret door leads out and down
Gardrin's family tombs and the false vampire crypt


Built from scratch
Finally,  here's some pieces I made up from bit from my bits box.
Four braziers.  Each has a round ridged base in bronze with a silver with a green flame leaping out of the top.  Tharnak stands nearby, the flames reach above his head
Tharnak investigates the braziers

The braziers are two wooden beads stuck on a 20mm washer. The flame is hot glue on a length of barbecue skewer. The whole is painted as seen, I must admit that the photo makes the flames look better than in real life. 

Tharnak and two snake fonts.  They are silver hooded cobras curled up with the head rearing. Each holds a bronze bowl of a greenish substance in its coils.  The snakes rear over the dwarf
Tharnak and the two snake fonts

The 'Snake Fonts' are toy plastic snakes glued to 40mm washers with an upturned button as the bowl. The buttons are metal and I had to grind out the bit that holds the thread with a rotary tool, which is why there's only two,  rather than the planned four. The whole lot is painted and the bowls filled with PVA glue mixed with green ink, partly to hide the rough interior. 

Combining the Season of Scenery and my Eight Week Challenge really helped me get the terrain ready for the game, I'll have to try this again.


Sunday, 13 July 2025

Dungeons and Dragons Eight Week Project - Scenery 1 - Planning and a Tomb

As I recently mentioned, I'm combining my eight week project with the Season of Scenery Challenge to add some scenery to the adventures.

Floor Plans 
In the past I've done full 3D and 2.5D builds, but this is going to be a bit less monumental. All this group has seen is maps drawn on Inkarnate and shown via Roll20. I'm looking forward to showing them another way, and experience has taught me that when players actually see terrain, they interact more with it, like the glow around objects in video games.
I plan to use my trusty Pathfinder mats, with some hand drawn prepared floor plans for special areas. I could print off the Inkarnate stuff, but that's a lot of ink, and I want to show that you don't need fancy software to enjoy the game. 
There's also the minor issue of furnishings. I try and have the Inkarnate maps as detailed as possible, but sometimes circumstances (the characters) can change them. It's not much of a problem if it's just moving a chest, but it can be more dramatic, as in the incident where the party deliberately collapsed a ceiling to stop a horde of gnolls.  I won't be able to print off new maps part way through the game, so drawing and terrain models are the way to go.
I'll try and draw out a few special encounter areas. Previously, I've used 1 inch squared flip chart pages, but these are nearly gone, and I can't find replacements at a reasonable price.  However, I did find a product called "spot and cross paper", used in dressmaking for patterns. This alternates dots and crosses on the vertices of a grid, and it's available in inches. A roll cost me under £17 for 10m on Amazon, and it's better quality paper than the flip chart too.

Scatter Terrain 
I've plenty of unpainted Mantic Terrain Crate stuff, which will come in useful, but I've already identified some gaps in what I need. For speed (and economy) I might use some of the Crooked Staff Print and Paste terrain, my limited experience suggests that it should be good.

But what do I actually need?

As always, the goal is to finish up with a terrain set useable for many games. 
While it would be nice to do a special piece just for this adventure, I suspect that time is against me, so, to begin with at least, it's going to be fairly generic.

Tombs are a must, there's plenty of exploring still to do in the crypts. 
Rubble/rubbish piles are always good, providing some cover if high enough, difficult terrain, great for hiding in or behind and very atmospheric.
Pillars, again good for partial cover and to prevent being surrounded. They also help a large underground space to seem more believable.
General Furniture; beds, chests, tables, crates and barrels. More stuff to add 'realism' and introduce stuff for the characters to interact with. I won't bother with benches or chairs, they can be assumed, and the models tend to get in the way. That said, if they are present, someone's bound to pick one up and hit someone else with it.
Special Furniture, such as altars, weapon racks, torture equipment, tents etc. may or may not be made. It's down to time available. A stone table* could stand in for an altar. 
I suppose tombs really fall into this category, but they are such a significant feature of the Abbey crypts, that I couldn't really leave them out.

But enough waffle, time for some actual terrain.

Speedpainted Tomb
Here's a tomb from Mantic's Dungeon Saga game.  It's supposed to be for a dwarf, hence the small size, but I think it looks fine. It's really an experiment in using Speedpaints to see if they are practical for getting the Terrain Crate stuff done quickly. 

I started with an Army Painter Dark Tone wash, followed by a white drybrush.  Then it was a simple coat of Army Painter Speedpaint Holy White.  The result is a grey rather than white, but it looks ok.
To add a bit of extra interest I painted the very top section in Vallejo Game Color Hammered Copper and then stippled Vallejo Game Effects Verdigris over it, especially in and around any cracks and flaws.
I really like the result, but I've only two or three of the model, so it's not really a practical choice for the adventure.  
I might reserve it for any particular special undead the party meets. Clearly I need to find an alternative for the tombs in the game.

Well, Well, Well
And as a bonus, here's the Dungeon Saga well. 
I painted one a while back to use in Frostgrave. This one is more experimenting with Speedpaints for Terrain Crate models.  Besides, there are wells in the Abbey, should I ever need a model.

Briefly, wash and dry brush just as the tomb, then I picked out various stones with various Speedpaints, including Pallid Bone, Gravelord Grey, Hardened Leather and Sand Golem. 
The whole lot was given a light dry brush of VGC Bonewhite to soften the harsh contrasting colours, then a coat of matt varnish, both to lose the glossy finish and to protect the Speedpaints. I worry that excess water (such as a spilled drink at a game shop) will reactivate them causing a colourful mess.

So there's a lot of waffle and my first two minis for the Season of Scenery. There's plenty more (especially tombs) to come. 
I'm fitting in the terrain building amongst the mini painting,  it's a nice change of pace. 

*I suppose the Dungeon Saga tomb would work as a stone table, but it does look rather funereal.

Friday, 20 June 2025

Dungeons And Dragons Eight Week Project

A(nother) New Project
I've been trying to clear the decks of ongoing stuff ready for an important project. The Thursday evening Dungeons and Dragons group is finally getting to play face to face!
So far we've only played online, and we've been going for many months, but at last we get to play without all the embarrassing pauses and connection issues.  Without Roll20, we can use maps and minis, my favourite way of gaming.
 

I want to have as complete a collection of minis for the game as possible, but that's not as easy as it seems. 
The party are currently exploring my fifth edition version of the fourth edition module, Madness at Gardmore Abbey, but I've added plenty of optional content, and I've changed large parts of the adventure to fit my vision and hopefully avoid some of that 4th edition feel*. 

So there's a big list of potential mini requirements.  Some stuff may be encountered before the live game day, so could be 'wasted' effort; others might never be encountered (again with the effort), so where to start?
And can I get it all done by mid August?

Characters
Well character minis are a must, even in games where I've used card standees for monsters I've stuck to 3D minis for the player characters. 
There are six (yes, six!) player, so that's probably the first target.

Creatures
I want to avoid spoilers, but they have done a fair bit of scouting out and general information gathering, so they've a rough idea of the various creatures they are likely to meet, including...

A dragon and it's kobold minions, various undead (they've already neutralised one necromancer), a Fae knight and his retinue, four minotaurs, quite a lot of orcs and some mercenary bands. 

There are more of course, but I'll try and keep them as a surprise.

Not Just Minis
And then there's terrain.
For the most part I'll use hand drawn floor plans, though I'm keeping open the option to make something suitably grand if time allows. I will be using some furnishings and props, probably some of my Mantic Terrain Crate bits where possible.
I might try building some extra bits, it will depend on time and need.

I had hoped to build some Orc's Drift terrain for Dave Stone's Terrain Challenge in July and August, but I might have to see if dungeon terrain and props count instead.

Planning Ahead 
I accept that I'm not going to get everything ready in time, so I'm going to have to plan smart.
If the PCs are a must, special creatures are also important, but I can work out a list of the most likely encounters. This will also help when planning the terrain and props.
I've still got quite a lot of the WotC prepainted dungeons and dragons minis, so I'll be looking through to see if any of these will be appropriate (no doubt regretting selling off so many). In some cases I've got Reaper Bones minis that I prefer, but if time is short, the prepaints may well get used.

Expect a few waffling posts where I overthink this.  I'll try and post (spoiler free) updates here, but I may be a bit quiet for a while.

Ulterior Motives
Long term reader's know about my Orc's Drift project (check the tag on the right if you don't), where the idea wasn't just to do stuff for the Orc's Drift Campaign, but to have armies and terrain sorted for many other games.

It's the same here.  I hope to have painted up quite a few minis from my 'loft of shame' for RPG use, and it should also help me sort through some of the stuff and decide what I want to keep and what I can get rid of.

* Firstly, I must say that I thoroughly enjoyed 4th ed when it was released; I did, after all, run an eleven year campaign using the rules.  
However, I found most of the published adventures suffered from a need to follow one path through, fighting everything in the dungeon in order.  Partly this is due to the aggressive scaling built into the game; the first adventure, Keep on the Shadowfell (actually published just before the release of the game, and, in theory is an exemplar of the new system) requires exactly this plodding through.  Individual encounters may have multiple paths and loops within them, but there is only one real optional section in the dungeon.  This focus on tactical rather than strategic play was, for me, the main reason I eventually decided that 5th ed was a system better suited to my wants.
Madness at Gardmore Abbey is one of the later 4e adventures, and is a huge pack.  It is generally reckoned to be the best of the official adventures, and is much less set in the approach the players can take; an aspect I play on to the maximum.


Monday, 19 May 2025

Orc's Drift Terrain: Bridge and Outhouse Restoration

I've struggled to get any painting done recently. Lots of real world stuff getting in the way, and what hobby time I can grab seems to have coincided with the hottest part of the day, and paint just dries too quickly. 

But I am sorting through terrain for Orc's Drift, and recently found my original bridge model. 
As with most of my stuff,  it's suffered over the years, but it's easily fixed. 
I've also got the outhouse, which needs a few bits sorting and updating. 
Painting may be off the table, but this kind of terrain work is fine, in fact, the faster drying time helps when gluing tiles on rooves.
Dwarves test out the new facilities

The Bridge Over the River Canis
Bridges are always useful.  They can be objectives and they provide interesting movement choices. Quite apart from it's place in the Orc's Drift campaign,  it's a very useful terrain piece to have in the collection. 
The underside of the bridge, showing construction and damage

The top of the bridge

I originally built the bridge from a card photocopy of the original, reinforced underneath with the thick card that I used to get from my job in printing.  Thinner card (about 1mm) forms the coping stones and filler gives the rest of the surfaces some texture. 
Over the years one side has broken and is hanging off, help in place only by some of the coping stones. 

To repair it I ran a bead of hot glue underneath to hold together and strengthen the internal joints. PVA glue was then used to repair the broken pieces of card coping.  
A quick touch up of paint brought the bridge back to full working condition, although I'm not sure if I should add a base.  I'm waiting until I've made some river sections before deciding what to do.

The fixed bridge from below

and as seen on the battlefield

The Outhouse 
Although an outhouse isn't really appropriate for a humano-centric pseudo-Medieval setting, it plays an important role in the inspiration material for Orc's Drift, so it's a must for the game. 

The Outhouse, currently vacant

That tired looking tiled roof

The model was built on a core of that lovely thick card again.  The walls were clad in wooden spills. These were the 80s hobbyist's equivalent of coffee stir sticks, sold in tobacconists (the 80s equivalent of Vape Shops) for lighting pipes (the 80s equivalent of... sorry, I'll stop now). 
The roof was tiled with thin card, and looks a bit tired. So I replaced it, using slightly thicker card (mail order card envelopes) this time around. To match the wooden construction I tried to give the effect of wooden shingles by scribing lines to texture the card like wood.  You can be the judge of how effective it is.
The updated outhouse, engaged


The Outhouse definitely needs a small base but I'll probably base a number of the buildings at once to keep them consistent. 

Both models got a bit of ink staining, Vallejo Game Ink Dark Green, to give an aged look and accentuate some of the textures.

So that's a couple of my old models renovated, and more terrain for the Orc's Drift project, and beyond that, for gaming in general.  I'm going to have to build some of the Orc's Drift terrain again, but I've at least one more building that I might be able to restore, though it's in far worse condition than the bridge.

Wednesday, 26 February 2025

Rangers of Shadow Deep Nest Trees

The second scenario in the first Rangers of Shadow Deep mission calls for four 'Nest Trees' with the possibility of a fifth turning up during the game.  
I've said previously that I'm avoiding building or painting anything too specific for RoSd, but these can be mixed in with other trees in any woodland and they will fit in very nicely in any MESBG scenarios set in Mirkwood.

The Original Trees
I didn't want to scratch build trees, so I used pre flocked plastic trees from a bag I got on Wish. I know a lot of stuff on Wish is poor quality or even outright scams, but these were OK. This bag of mixed sizes might well appeal to thrifty gamers, but if you buy it for 28mm gaming you'll find the trees are small. I got them for smaller scale games, and some will be appearing in 6 and 10mm Fantastic Battles. For the nest trees I'm happy for them to be on the small size for 28mm, I think they'd make impressive 15mm trees.

Sample tree straight from the pack. Very regular and very green 

Preparation
Now the colour of the flock is, being kind, 'garish', and I wanted dead looking trees anyway. A bowl of very hot water softened the glue holding it on, and some laborious picking off soon got rid of it. I was actually impressed with how good the glue was, I've had experience with similar trees where a light draft blows most of the flock off. 
I also took the time to bend some of the branches out a bit, warming thoroughly in more very hot water, then setting the new pose in cold water.

The trees need bases, I've used GW 40mm bases and 60mm MDF in the past. These are 50mm plastic bases from Reaper, included in their recent Kickstarters (I use clear bases for my Reaper stuff, so these are surplus).  A hole nearish the centre for the end of the trunk, then hot glue both underneath and a bit round the top to keep it in place. Originally I planned to use the glue gun to melt the plastic trunk a bit to shorten it and provide a better fix, but the plastic wouldn't melt just with my hot glue gun. I ended up trimming with scissors to give different height trees.

Based and ready for painting

Painting
After basing the trees were given a black prime from a rattle can. Then a heavy brown dry brush (because most people think tree trunks are brown), followed by a grey dry brush (because most tree trunks are actually greyish).

Webs
If I'd thought ahead, I'd have got some of those Halloween fake spider webs, but I didn't.
Instead, I'm using herbal T-bags. These aren't the 'paper' ones you usually find (which actually can contain plastic), but a more 'fabric-y' looking material.  I suspect they are more common in 'exotic' teabags - these were a gift.  I don't know what they are made of, but if unused, they can be teased out to give a reasonable web effect.  The contents will come in useful later, so they are put on one side.

The tea bags in tea bag form, opened out, and teased apart to make webs

This seems to look best when some of the material is caught on the branches, then pulled out before reattaching it further along the tree. It can also be teased out by hand,  just experiment and have fun. 
Of course, these webs aren't sticky, so I used a bit of watered down Mod Podge, with a quick spray of isopropanol first. Too much of this can spoil the delicate web effect, and I wonder if just a spray of matt varnish would have done the job.  Once the sealing mix was drying, I added a few more bits of the material to bulk out the webs.

Finishing Off and Details 
Then it was just a case of adding basing materials, bearing in mind that I wanted them to look like dead or dying trees, and anyway, there's not usually a lot of vegetation at the base of a tree, the tree out competes it for light, water and nutrients.
I gave the bases a coat of coarse sand, but this didn't really look right for woods, it was too bare and needed more texture. This is where the contents of the tea bags comes in, broken up a bit, they look suitably like branches and twigs.
Then I added a few bits of decoration; some skulls and a skeletal torso from Mantic Games' Undead sprue, and some 'spider eggs'. 
These are pellets of 'Pearlite' (a product sold to bulk out soil and improve drainage for houseplants) though small polystyrene balls would work just as well or better. I mixed them into some PVA glue and then just dolloped it on where it looked good. Once dry, a bit more of the webbing to 'nest' them finished the job.

So there they are. Five web entangled spider nest trees.
I'm really pleased with how well these went together, and the materials were pretty easy to source, especially if you use polystyrene balls rather than vermiculite. 

A Recruit faces off against a Giant Spider near it's webbed tree, unaware that another Spider lurks behind him

The Wish trees are decent enough if re-leafed. In fact, I'd suggest that they are a good source of tree armatures for a very reasonable price, if you're happy to buy from Wish. I've got some more in the process of having better foliage added to give me some better trees, which I really must get around to finishing.

Note that I started these quite a while ago, but they remained unfinished as I wasn't quite happy with the bases. I wanted to do a bit of scenery as part of Dave Stone's Paint What You got Challenge , so quickly finished off the bases and here they are.  


Tuesday, 15 August 2023

Crooked Staff Terrain: New Frostgrave Ruins

After a Short Break...
I've not been posting for a while, partly because I've been very busy with family stuff and partly because I've hit a low patch for inspiration.  When this happened last time I built some ruined walls for Frostgrave/Dungeons and Dragons, which helped get me motivated again.  Lets see if that works again.

Why More Ruins?
My current set of Frostgrave terrain is 'eclectic', to say the least, you can see pretty much everything I've got in this battle report.  It certainly works, but I'm aware that more is better when it comes to the game, and many of the pieces still need finishing (usually basing).
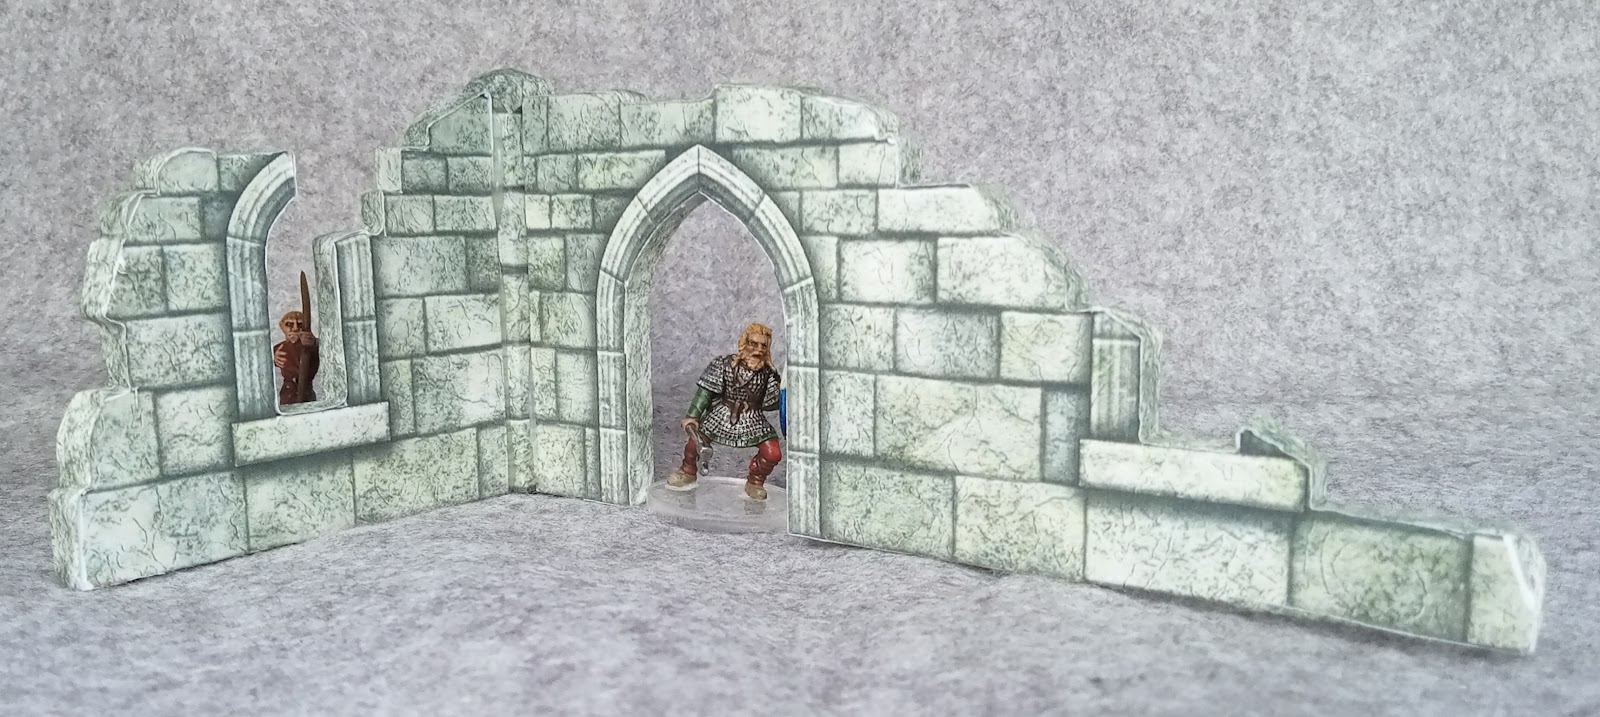
I came across Crooked Staff Terrain on YouTube a short while ago, specifically his (then) latest video building ruined corners.  OK, I thought, but nothing I can't do myself.  A closer look suggested that not only were the ruins very nicely done, but looking through his back catalogue, his cladding method produces very good results, particularly for the time and money invested.  I definitely wanted to more Frostgrave ruins as cheaply and quickly as possible, and this looked like the answer.
I would certainly want to extend the ruins to multiple floors and, perhaps, add some extra details to the flat surface of the buildings, but recent posts suggest that he is addressing that, with a second video and download soon.  This seems to be additions to already built ruins, so time to build a basic corner ruin and see what I think.

I'll not give instructions on how to build the ruin, he does that very nicely on the video, but here are some photos of the first corner ruin I made.

Norse 'knight' in doorway.  The ruin height is about 3", and the sides are about 3" and 6"

From the inside.  The window is just the right height for the archer

Comparison with one of my carboard ruins.  This was the closest I could find in form and function, though it does have  partial first floor.  The Crooked Staff ruin is better detailed and was a lot faster to build

Results
So that's a ruined corner built.  It's my first try with Crooked Staff Terrain, and I'm very pleased with the results.  I could have been neater with the cladding and I certainly need to make sure that I have a new sharp blade,  my first cuts were very ragged, tearing the foamcard.  
In comparison to the cardboard ruins I've built previously these work out slightly more expensive, using purchased foamcore rather than free cardboard, and I suppose the printing costs are a small extra, however, no paint is required, so that probably balances out.  The biggest advantage is the speed; it's much quicker since there's no painting involved, and they look brighter than my early cardboard corners.
I like the pale grey look and the weathered stones.  The artwork implies some 3D texture, and I believe the next set will actually add some more relief.

More Ruins for the Future
I'll certainly do some more and I'm thinking of basing the ruins to add extra strength, probably just a card strip wide enough to enable a bit of texture to be added.
I do like the idea of a whole integrated set of this pattern of stonework, designed to pack nicely in a box, that I can just pull out for games of Frostgrave.  I may even slap some thick white paint on to represent snow (which would mitigate my messy cladding), and I suspect hitting them with a spray of Matt Varnish will help protect the printing from moisture.


Wildspire Miniatures: Bugbears, Mummies and Dire Wolves Painted

In my last post I mentioned that I recently got a set of Wildspire miniatures , specifically the Classic Creatures Expansion 1.  I've be...