Showing posts with label crafting. Show all posts

Wednesday, 22 July 2026

Season of Scenery/Dungeons and Dragons Master Forge Complete

I got the Master Forge done in time for the game.  Now that's over, I'll show it here. 

You might want to refer to the adventure playthru for more details of what things were and how the heroes interacted with the terrain.  I gave more details on the construction and planning in an earlier post, which, again, may prove useful to review.


The Master Forge
I built four levels of the forge and mapped out the remaining levels and the surrounding cavern and a little bit of the mines on dot and cross paper.  The roll I got last year is still going strong.

The four levels have two entrance/exits to the cavern surrounding the Forge. They are connected by stairs or ramps, and a lift shaft also links them, giving explorers options when moving through the structure.

Basement 
Stone steps lead up in the front left corner, a lift shaft, with lift platform, occupies the front right.  Pillars surround the centre of the room, this area is walled of by wooden walls
The basement

From the other side the furnace base can be seen, an octagonal (at this level) structure with dwarven style decoration
Basement from the other side

Steps lead up to the ground floor and the lift platform rests on the stone flagged floor. 
The base of the furnace occupies one corner. 
Four pillars surround the centre and wooden walls block this area off. 

Ground Floor (casting floor)
The ground floor has a door to the outside, steps down to the basement in the front left corner and a lift shaft in the front right.  Pillars near the centre support the upper floors, the space in between them is essentially a sand pit
The Ground Floor

From the other side the furnace can be seen.  A cylindrical structure decorated in dwarven style rests on a low octagonal plinth.  in teh front right corner is a wooden ramp leading up
Ground Floor from the other side

Doors lead out into the cavern (though they were unusable in play due to the water pressure behind them), and a wooden ramp leads up to the mezzanine level. 
The centre of the room is a pit of sand, used for casting from the furnace, which can pour molten metals into it.
The heroes never fully drained the cavern, so didn't enter through the main doors.  If they had done, this is the view they would have seen.

From the door, the ramp can be seen on the left and the top of the steps on the right.  The pillars surrounding the sand pit are in the centre, with the furnace back left and the lift shaft back right
The view from the door

First Floor Mezzanine 
There are large gaps in the floor here (by design).  A wooden ramp leads up from the front left and the lift shaft is in the front right corner.  The pillars again surround the central area, which is partially open to below, and the furnace occupies the back right
The mezzanine level

A good view of teh furnace (front left) and the ramp leading down to the lower level
Mezzanine viewed from the other side

There are large voids in the wooden floor, effectively making the ground floor and this floor one space. 
A wooden ramp leads up to the next level.
There are two doors in the furnace at this level, with flooring allowing the dwarves to access them (for hand pouring of the more precious metals).

Second Floor (ore loading)
Four levels of the Master Forge in 3D terrain.  Each floor has four central pillars, a circular structure fills the far right corner, passing through all levels. Various wooden ramps and stone stairs connect the levels
The Ore Loading area atop the lower levels

Alternate view, showing the furnace in greater detail.  The top level (ore loading floor) has stairs leading to the upper levels
And from the other side


A door leads to a bridge over the cavern, ore was brought in on carts when the Master Forge was in operation.
The top of the furnace is here, with shuttered openings for loading the ore and other substances for the smelting process.
A wide flight of steps lead up and then divide, both arms end in locked doors on the next floor, the Crafting Level.  This level had previously been explored by the heroes, hence it had a low priority when it came to building the terrain.  In fact, it never got beyond being drawn out on paper.

Construction 
As mentioned previously, I used the Crooked Staff method (using corrugated and thin card with the textures printed on paper and stuck to the card) on Fat Dragon EZ Lock Dungeon terrain including the Hall of the Mountain King set.
This did lead to some changes; the original map had stairs and ramps that ascended at 45°, but the card terrain sets have a shallower angle, so I had to account for that. Initially the floors were 20 foot apart, but this would have meant a lot more space for stairs, so the ceiling height became a mere 10 foot. Mind you, it is a Dwarven building.

Walls and Corners 
Initially I wanted to craft sections of walls that could be removed as required. As time ticked by I decided to manage without.
But the upper floors had a tendency to sag, especially at the edges, so I built corner pieces to act as supports and a visual reminder that there are ten foot walls around each floor.
In play, with the floors separated, the corners can be removed.

The Furnace 
I wanted the furnace to look impressive. There's a nice one in the Halls of the Mountain King set (partly why I decided to use it). In the end, though, it wasn't really what I wanted, so I used some of those textures on a Pringles tube cut to size. Other features on the PDF were repurposed to make the fittings on the structure, such as the little doors and the chute.

The Vault of the Fang
The climax of the adventure took place in a strange extra dimensional space. This was simply drawn out (mostly because this was a late addition to the adventure and I didn't have time to do the concept justice in a rushed 3D build).
The tooth was a plastic fang from an old Halloween necklace, trimmed and mounted on a clear base. 
The crystals were taken from a piece I made for the 4E campaign, dismantled for the purpose.

And that's it.
I probably put a bit too much effort into this, but I do want these occasional sessions to feel special. 
As I was building the forge, I was aware that it might be a fancy setting for a mediocre adventure. Fortunately those Fornits seemed to do their job just in time.

What's Next?
Well there's still some time left for the Season of Scenery challenge, and I do have some (lots) of unfinished stuff.  Hopefully I'll get round to finishing some of this off.

Wednesday, 26 November 2025

Scatter Terrain for Skirmish Games

At the start of the year I used the Paint What You Got Challenge as an opportunity to prepare for the first Rangers of Shadow Deep mission. This was mostly building, kitbashing and painting minis, but I did want to add to my terrain collection as well.  I managed to finish five Nest Trees, but there were several other bits that weren't quite finished. 
They were all built and painted by the end of March, but I couldn't decide how I wanted to base them. Long time readers of the blog will recognise this as a common fault in my hobbying, especially with regard to terrain.

Other things got in the way, of course, but I've just got around to finishing these three pieces.

Three bases of rocky terrain.  A set of rock spires in a pale grey with brownish tones, a low squarish boulder and a craggy tor like collection of three different height rocks.  The later two are a darker grey, but again with brownish tones
The three rocky bases

The same from a different angle, showing some of the smaller rocks around the base of the tor
A different angle

Rocks
Many skirmish games benefit from cover, and rocks and boulders are one possibility (they are a big part of many Rangers of Shadow Deep scenarios).  These were simple to make, just carved scraps of XPS textured with a ball of foil.  I'm experimenting with different forms and colours, as I plan on making more of these.  Each piece has a slightly different function in game;
Boulder  This is the simplest; a big rock that provides cover and acts as an obstacle.  The colour scheme is similar to the Tors, classic wargamers grey rock. This, and the tor, was designed to allow minis to be placed on the rocks.
Rock Tor  This blocks line of sight or provides cover.  It can be climbed over, and minis can be placed on it.  The form and colour was loosely based on the gritstone formations found locally, though those tend to be darker, thanks to a couple of hundred years of industrial pollution.
Rock Spires  These block line of sight and can't be crossed, at least by creatures limited to surface movement.  I painted them a lighter sandy colour not so obvious on the photos, possibly influenced by vague memories of Bryce Canyon.

Back to Bases
For years I simply stuck terrain on to MDF, prior to that I used hardboard, which is even more prone to warping than MDF, and in the early years, just cardboard.
Fairly recently I discovered foam board (NOT the XPS sandwiched by thin card stuff). Waterproof, so it's much less likely to warp, and very easy to cut. This is now my basing material of choice, at least until I discover something better.

To texture, I used to use sand and paint, latterly with static grass and tufts to finish off. But this gives a fairly uninteresting result. 
I've seen some great terrain and basing, for instance, this Middle Earth themed set from Microforge Minis; if I can achieve something like that, I'll be more than happy.
A lot of hobbyists use dried, baked soil, but round here this tends to be quite dark, almost black. To match my mini bases I want something more traditionally brown. I'd like to grab some of the lovely rich brown soils from the Vale of York, but so far I've not got round to it. 
Failing that, I've been collecting dried tea leaves (loose tea*, as it has a nice granulated texture) and dried coffee grounds. 
There are potential issues with using these; they can go mouldy, but I've dried and baked them thoroughly first, and I plan on sealing them well, so no additional moisture or air should contact them. 
Fingers crossed, this should work.

The Answer's in the Soil
For my first try (the individual rock) I mixed up some brown grouting powder with dried tea and coffee in roughly 2:1:1 proportions. I found that the pale grout was by far the dominant colour, so mixed in a bit more of the coffee. 
The base was given a coat of Mod Podge and the mix sprinkled over, making sure that everywhere was covered.
For the other two pieces I applied patches of tea and coffee to parts of the base; this bit of variety in colour and texture gives a much more interesting and realistic look.  I then filled round with the grout and scattered some over the tea and coffee to blend them more into the ground.

Seal of Approval 
Once the Mod Podge was well on the way to drying, I gave the base a spray of isopropanol. This helps break surface tension and allows the sealant to soak in to the ground texture.
The sealant is simply watered down Mod Podge, a 1:1 mix, though a bit more water won't harm. When I'm doing this stage with minis bases I just dollop it on with a brush, but on a larger bases like these, a dropper or syringe is much better, and doesn't disturb the carefully piled clumps of foliage in the second seal stage (see below).
Unlike just PVA glue, the Mod Podge contains a resin. It's this that I hope will protect the tea and coffee from moisture, as well as making sure that the texture stays on the base.

Green Fingers 
With the soil firmly in place, I added some Fine Turf. I clumped this around the base of the rocks to look like low bushes. I also added some static grass in several different colours and lengths, and finally a few tufts (including some 'flowers').
The vegetation was then sealed in just like the ground texture.

The three rocky bases with minis to show scale.  The lower rocks will provide cover and the taller bits block line of sight
Rangers explore the rocky borders of Alladore

Finally 
So that's three small pieces of terrain.
It might not look like much, but it's important because I've now got a method I'm happy with. I've several more pieces of terrain just waiting for basing, and plenty more that I want to build, such as the Bogel's Farm. 
Now I can get these done and maybe, perhaps, end up with a box of terrain that I'm happy with.

*In this case Rington's Breakfast Tea, though of course other teas are available. It's very tasty though.

** Unless, of course, it all goes mouldy in a few months, in which case it's back to square one.

Tuesday, 15 August 2023

Crooked Staff Terrain: New Frostgrave Ruins

After a Short Break...
I've not been posting for a while, partly because I've been very busy with family stuff and partly because I've hit a low patch for inspiration.  When this happened last time I built some ruined walls for Frostgrave/Dungeons and Dragons, which helped get me motivated again.  Lets see if that works again.

Why More Ruins?
My current set of Frostgrave terrain is 'eclectic', to say the least, you can see pretty much everything I've got in this battle report.  It certainly works, but I'm aware that more is better when it comes to the game, and many of the pieces still need finishing (usually basing).
I came across Crooked Staff Terrain on YouTube a short while ago, specifically his (then) latest video building ruined corners.  OK, I thought, but nothing I can't do myself.  A closer look suggested that not only were the ruins very nicely done, but looking through his back catalogue, his cladding method produces very good results, particularly for the time and money invested.  I definitely wanted to more Frostgrave ruins as cheaply and quickly as possible, and this looked like the answer.
I would certainly want to extend the ruins to multiple floors and, perhaps, add some extra details to the flat surface of the buildings, but recent posts suggest that he is addressing that, with a second video and download soon.  This seems to be additions to already built ruins, so time to build a basic corner ruin and see what I think.

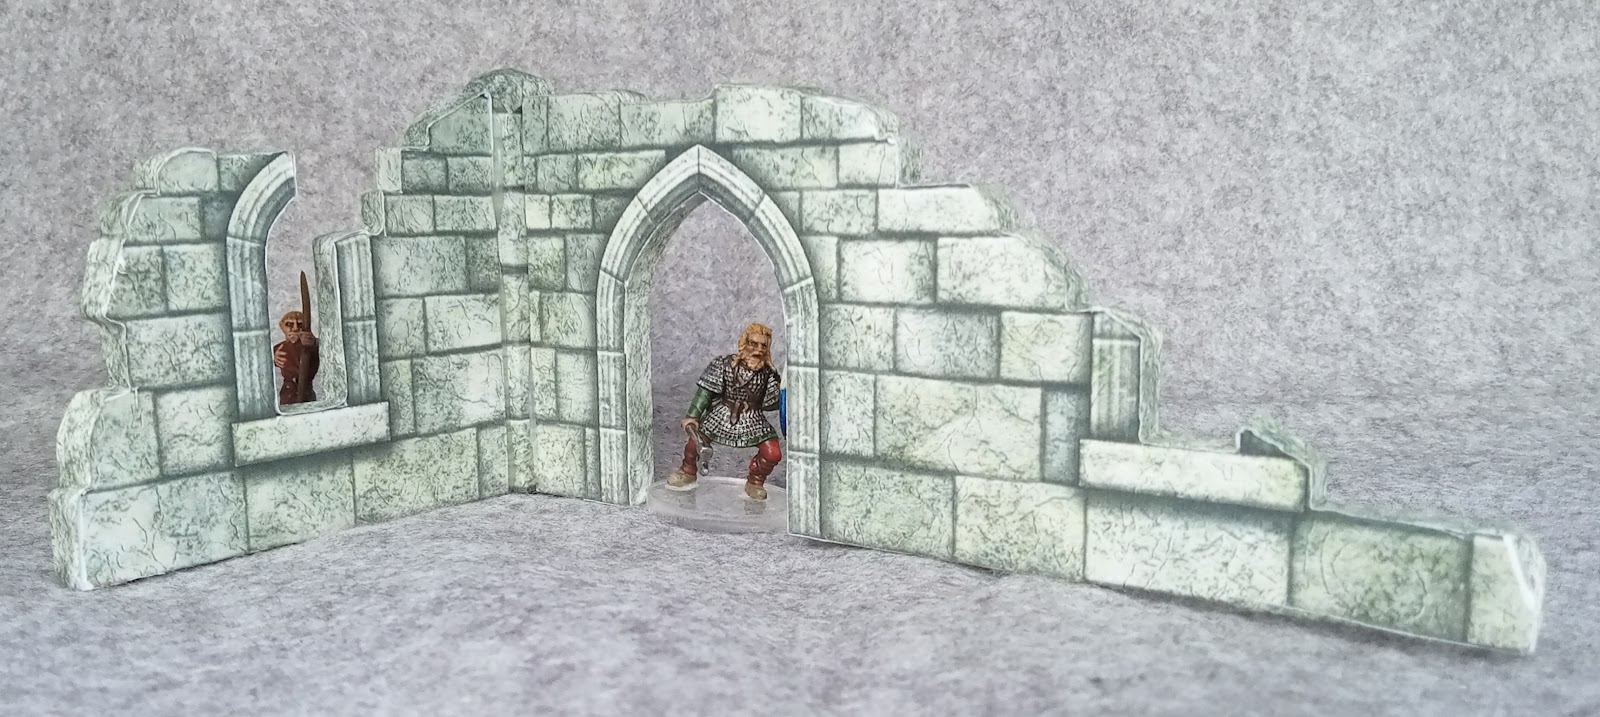
I'll not give instructions on how to build the ruin, he does that very nicely on the video, but here are some photos of the first corner ruin I made.

Norse 'knight' in doorway.  The ruin height is about 3", and the sides are about 3" and 6"

From the inside.  The window is just the right height for the archer

Comparison with one of my carboard ruins.  This was the closest I could find in form and function, though it does have  partial first floor.  The Crooked Staff ruin is better detailed and was a lot faster to build

Results
So that's a ruined corner built.  It's my first try with Crooked Staff Terrain, and I'm very pleased with the results.  I could have been neater with the cladding and I certainly need to make sure that I have a new sharp blade,  my first cuts were very ragged, tearing the foamcard.  
In comparison to the cardboard ruins I've built previously these work out slightly more expensive, using purchased foamcore rather than free cardboard, and I suppose the printing costs are a small extra, however, no paint is required, so that probably balances out.  The biggest advantage is the speed; it's much quicker since there's no painting involved, and they look brighter than my early cardboard corners.
I like the pale grey look and the weathered stones.  The artwork implies some 3D texture, and I believe the next set will actually add some more relief.

More Ruins for the Future
I'll certainly do some more and I'm thinking of basing the ruins to add extra strength, probably just a card strip wide enough to enable a bit of texture to be added.
I do like the idea of a whole integrated set of this pattern of stonework, designed to pack nicely in a box, that I can just pull out for games of Frostgrave.  I may even slap some thick white paint on to represent snow (which would mitigate my messy cladding), and I suspect hitting them with a spray of Matt Varnish will help protect the printing from moisture.


Tuesday, 4 April 2023

Chillcon 23

I got to Chillcon 23 this last weekend.  It's a lovely show in Sheffield, with plenty of room, and much better lighting than I remember at FIASCO!

I was relatively restrained with my purchases, picking up the jig from the Slice and Slot Kickstarter that I backed.  I also got a sample pack of the printed doors, arches and windows, just so I can have a go while I wait for some to be printed*.  I've been playing around with these and I'll make up some ruins that will be ideal for my Middle Earth terrain.  These particular prints were from MTG Terrain.

I also got some 3D printed crabs which will make a great Tidal Swarm for my Trident Realm from Iron Gate Scenery.  They have plenty of nice normal animals alongside some great looking fantasy stuff.  I was tempted by a Bolt Thrower for my Kingdoms of Men, but it is quite a bit too big for the 50mm base required.  The crabs, however, look just right for a Tidal Swarm regiment.


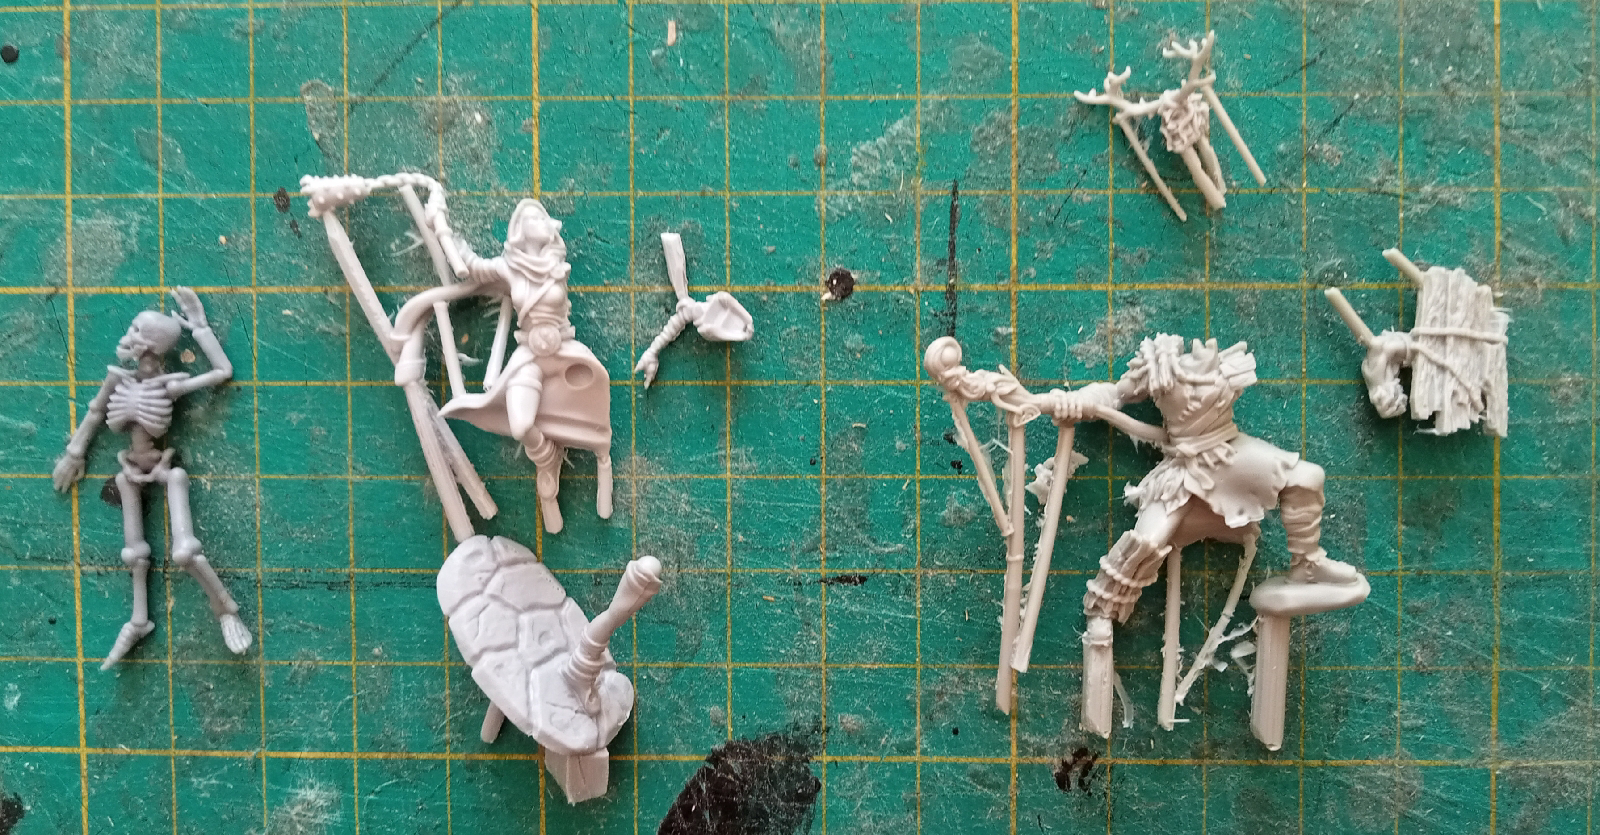
Just as a sample I got three minis from The Lion's Tower who had a lucky dip, £5 for 3 minis!  I've not heard of this company before, but I'm very impressed.  Looking at their catalogue later I particularly like the ghouls, great for roleplaying.  I think the minis I 'dipped' are a skeleton corpse, a human female monk with flail and a chap I haven't IDed, but I think he'd make a nice druid.


Finally I picked up three packs from Ramshackle Games.  These seem to be prototypes for a new range of folklore style goblins.  Think Brian Froud rather than Games Workshop or Tolkien.  I was particularly impressed by both the enthusiasm of the young man we talked to, and the odd nature of some of the sculpts.  I understand that he plans to Kickstart the range soon.  I got a robed goblin with a cleaver and wearing some sort of mask (it could just as well be a rebreather for a SciFi setting), a lovely female goblin with a slightly 'hedgehog' face and different options for arms, and a pie and tea service - ideal objectives.

I also spent an enjoyable half hour talking about Early Medieval music with the re-enactors.  A couple of them have a  band, Elven Dale, and it's just my sort of thing, Early Medieval and new tunes in the the same style.


*I know I don't have a 3D printer, nor am I ever likely to get one, but I have friends who do.

Thursday, 12 May 2022

3ITC - Bultha's Farm - Walls and Texturing

Once I'd drawn the plans I cut the walls out of pink XPS using my Proxxon. I cut the edges to 45°, easy to do by setting the wire at the required angle.

Then I textured the outside of each piece first using a Green Stuff World textured roller. I find it benefits from deepening the mortar lines, to see where I'd gone (and so it shows up better on photos) I used a black biro. Once this was done I used a ball of kitchen foil to add a rough stone texture. Finally I used a pen top to push some of the stones in a bit. This more uneven surface gives a more natural look.
For the insides of the walls I wanted a rendered finish, but with some of the render missing, exposing the stonework beneath. I cut a thin irregular strip from the inside, the exposed surface was then textured with a pen to show the stonework.  I didn't even try to match the placement of stones on the outside; the walls are two stones wide with a gap in between.

I added a strip of XPS to the interior walls to support the upper floor.  I also added strips of cable tie to the inside of the door frames to give a more Sci Fi look.  I considered doing the same to the windows, but the ties I had looked too bulky.  If I find some thinner ones I may still do this.  I imagine the ridged texture represents some sort of field emitter, perhaps to keep out dust?  And yes, I am totally using this in my Tatooine builds.

.

The doors themselves will be long gone of course.  For basing I used the thick plastic sheeting used for signs.  It's my first time with this stuff; so far it seems strong and is easy to cut and sand smooth.  I'll use it for the damaged upper floor as well, probably carving in some sort of texture.

.
.

I wasn't sure about the floor and tried both card and balsa (floorboards) but neither looked quite right; too 'fantasy'.  Finally I cut a thin piece of XPS for the floor, cut out some damage and textured it with the foil ball.  This seems more what I was thinking of.  I'll add some rubble, but the model has to work as a gaming piece, so the floor has to be clear and level enough for minis to stand up in it.

Next I will give everything a coat of mod podge and black paint (I may add some greebles first) then it's on to painting.  I'm not adding the roof or the upper floor until the bulk of the painting is done, but I'll get them cut out and textured soon.

Thursday, 5 May 2022

3ITC - Bultha's Farm - Mock-Up

Once I'd decided how the ruin would look, I decided I'd build a mock-up to play around with size and shape.  If you've seen some of my previous builds (the Tavern and the Dwarf huts) you'll know I like to do this to help with any tricky or experimental pieces.  Since the ruined farm is pretty much me making it up as I go, the mock-up was a must.
I cut the drinking chocolate container into half, so I have two pieces, one for a future project.  I used corrugated cardboard for the walls.  This is simply to allow me to experiment with shape and the height of the ruined walls, and to see how practical an area of upper floor would be, there was no attempt to make a practical model (the walls on the final model will be much thicker, for example).

I first tried walls of 100mm height.  I thought this might look a bit too tall for a farmhouse (as I imagine it), and I was right.

100mm high walls - too tall

So I cut them down to 50mm high; much better.  The proportions now seem about right to me.  This pretty much matches the radius of the container, so that works nicely for the upper floor.

50mm high walls - much better

Next I sketched in the shape of the ruined walls and cut them out once I was happy with them. Despite the description stating that the walls were all about 1.5m high I kept one corner at full height.  This gives a more interesting ruin and allows me to have a small section of upper floor to give a firing platform.

Six marines fit easily inside the ruin, the sixteen given for the battle should just about do it.

A better idea of how much space is in the building.

Note the pencilled in door

Using the upper floor for better lines of sight.  

I'm pleased with the look of the mock up.  I like the shape and proportions of the building, and the placement and size of windows and doors (one at each end, just shaded in on the mock up).  That gives me a pattern to cut the walls.  

I drew a plan to help me when I come to cutting the XPS.
Very faint plan

I'll make the walls out of 10 mm thick XPS.  I'll cut the roof to shape once the rest of the ruin is built.  I'm including a 5mm 'hip' on each side of the roof, though this will only be evident on one corner of the front, the rest is missing.  This gives a base for the edge of the roof, and I imagine there was some sort of guttering to collect water.

Next, cutting and texturing the XPS, and making the basic building.


Saturday, 30 April 2022

3ITC - Bultha's Farm - Planning

The 3ITC isn't going well.  Real life has interfered, in both positive and negative ways.  But I am determined to make a start, and I've gone for the ruined farmstead from The Battle At The Farm from the original Rogue Trader Warhammer 40 000 rulebook.

The (horribly unbalanced) scenario has fifteen marines plus the chapter master holed up in a ruined farmstead.  The map names a nearby hill as 'Bultha's Rise', so I'm calling the farmstead Bultha's Farm.

There's not a lot to go on in the book, in fact, in the spirit of keeping it accessible, the photos use the ruin from Bloodbath at Orc's Drift.  I'd like my version to look a little more Sci Fi though.

The map of the battle site

A suggested table layout

The text reads "The farm lies in ruins following the initial assault some days earlier. The main building has survived only as a shell of broken walls about 1.5 metres high, it is built of stone. Outhouses and cattle pens exist only as low stone walls."

Not much to go on, but that gives me plenty of room for my own interpretation.  There's no real guide to the size of the building.  The very nicely detailed map lacks a scale, the text suggests the table is 6ft x 4ft, but that makes the scenario even more difficult for the Orks, marching across a lot of open terrain towards 16 Space Marines in cover.  The photograph suggests that the table size is smaller, that ruin is no more than about 4 inches on its longest side, making the whole compound somewhere close to 12 inches across.  so I'm going to have to interpret (make it up as I go along).

I'll stick to a rectangular shape, but as a nod to the Orc's Drift ruin I'll have a small section of roof remaining, possibly even with sufficient of the first floor to provide a firing platform. Most of the walls will be lower, around 30mm, with a couple of doorways and maybe sills where there were once windows.

I wanted a different roof to the sort I usually build, and decided that a curved section might look good, rather like the 20mm Tatooine building I did here.  I wanted to use some of the plastic trunking you see on building sites, the ribbed section looks great.  However, I couldn't source any, so I'm using a drinking chocolate container for the roof.  Although I'll be hacking it up to make the ruined roof, I'll be keeping the footprint of the building the same as the tin.  I may someday make a non ruined version.

The walls will be XPS pink foam, textured to represent the stone walls.  I'll pile some rubble around the walls, but not too much, I want to be able to place minis in it.

If time permits I'll also make some matching walls.  I have some old 'Platformer' terrain with some nice looking bits that I think would look good on the top of stone walls, though most of the walls will be partially ruined.

So those are my plans, and I've just got a post in about them before the May deadline.  Next month I'd better start building, beginning with a card mock-up.

Wednesday, 15 December 2021

SITC Finished

At last I've completed my dwarf mine buildings for the Second International Townscape Challenge - Beyond Human.  I'm a bit late compared to Merjin and Bodvoc, but still within the December deadline.


I kind of slowed down at the end as I kept thinking of ideas to decorate the bases, in the end I went fairly minimal with this.

First up is the Metal Hut that you can see being built here.  I chose a sort of 'industrial grey' for the colour scheme with a base coat of Vallejo Game Color Sombre Grey overbrushed on top of a black primer.  Then a highlight of VGC Steel Grey and a final drybrush of VGC Glacier Blue.  the doors and window were painted dark blue, I'll use this as unifying colour across the three buildings.  The various extra bands look good emphasised with a line of Vallejo Game Ink Dark Green to show where algae has stained the building when it gets wet.  I like this effect, and use it on most of my buildings, as can be seen on the rest of the buildings below.


Next is the Wooden Shack, being built here.  I've gone for a dark weathered look, rather than the chocolaty brown of the original card building.  Over a black prime I overbrushed VGC Scorched brown, followed by VGC Leather Brown, then a drybrush of VGC Stonewall Grey and finally VGC Bonewhite.

Bother, I missed edging the base


Finally, the Stone Cabin (see the build here) has a basecoat of Vallejo Model Color German Grey over a black prime.  Several of the stones are picked out in browns and lighter greys to give variety to the end result; it doesn't matter what browns and greys are used.  The whole lot is drybrushed with VGC Cold Grey followed with VGC Stonewall Grey.  A final drybrush of VGC Bonewhite then a wash of black.


I find it helps to think of the purpose of the buildings when it comes to building and detailing them.  In Terror of the Lichemaster, the Wooden Shack was the sleeping quarters of the dwarves, the Cabin was where the dwarves brewed up and hut was a tool store.  When I had built the stone cabin I thought it looked more impressive, and better suited for the dwarves' sleeping quarters.  The Wooden Shack can be where they brew up, rest and play dominos (seriously, that's what the scenario pack says).

The final decorations, or greebles, were finials on the Stone Cabin made from beads and a length of wooden skewer, and GW dwarf shields on each gable.  I made a wooden box out of stir sticks to hold rubble, presumably the dwarves are sifting through it for anything interesting, and I made some pit props out of match sticks, textured with a saw blade and washed with Sepia wash.  These are piled up ready for use by the wooden shack and the metal hut.  I have a few more greebles planned, but my Renedra barrels have gone missing and I'm out of thread.  I would like to add a tool rack on the side wall of the Wooden Shack, and something, I'm not sure what, on the base of the Stone Cabin.

I had also planned to make the mine entrance from TotL, but I'm running out of time.  Fortunately I found the original model I made back in the 1980s.  I think with a bit of repainting and rebasing it'll do fine and fit in well with the set.

I set out to try and make some buildings that looked 'dwarven'.  I think I've succeeded.  I'm particularly fond of the Stone Cabin, and I think this might be the look I'll use in future.  I might even add a lean too, in true Warhammer style, but using the techniques and look of the Metal Hut.


Wednesday, 8 December 2021

Townscape Collection

Whilst at Bodvoc's for a game of Fantastic Battles we took the opportunity to photograph our various Townscape buildings.  You should recognise some of these from previous challenges, but Bodvoc has quite a collection that he has built up over the years.  
Interestingly, some of his use carcases that I gave him many years ago; the small shack, the stable block (must build one myself for the Inn) and the building with the pantile roof.  I had reached a point where all my gaming was in 15mm, and they were unfinished, so I saw no point in keeping them, and he was looking for 28mm terrain.  He's done a great job of completing them.

A decent sized settlement, great for skirmish games

And finally, my unfinished dwarf mine buildings next to Bodvoc's completed Norse Dwarf house.  I'm still painting the mine buildings and sorting out greebles for them.


Wednesday, 24 November 2021

Building Tatooine in 20mm Part 3

Last night I had another game of Star Wars Galactic Heroes. It was very much a last minute thing, but I was determined to have more terrain on the table.
I quickly cut some XPS blocks, and even had time to stick some half polystyrene balls onto one of them for domes, but there was an awful lot of pink on the table.

A lot of pink foam, which looks a pale buff or orange in the photo.  This is a much better amount of terrain than the last game.

Today I decided to work on one of them, since the dwarven stone cabin was drying prior to painting.  I've now got it to the stage of needing texture and 'greeblies', then painting.
The arches are cut on the Proxon using a Shifting Lands arch template.  I got one as a freebie when I ordered my Guider Pro. Very useful, though I still need some practice with them. 

Building front

Building back, looking at it I might replace the buttresses with thicker ones.

I'll probably put this away until I've finished the SITC - BH, but I certainly want to get those pink blocks turned into Tatooine terrain.

And then when I've got a box of 20mm terrain done, time to start on the 28mm stuff.


Tuesday, 23 November 2021

SITC - Building The Stone Cabin

I've had a bit of a change of plan regarding my dwarven buildings for The Second International Townscape Challenge. Initially I planned on making two or three versions of building 8 to try out different styles and finishes.
Having built a wooden version I've now decided to move onto the other buildings from Gimbrin's Mine, building and, and try the different styles on them. 

So the second building is No 6 in the Terror of the Lichemaster pack. I'm going for a stone build, these are dwarves after all. 
As with the wooden shack, I gave the original a 'cabinectomy'. I built the whole structure out of XPS, milled to 5mm thickness. To give the cabin a more dwarven look I added pillars to each corner, these were 10mm square, with the outside corner taken off.  The walls would be butted up against the pillars.

Prior to assembly I recessed areas for the door and windows.  The windows were again granny grating, the door is a piece of balsa, scribed to give a planked effect.  The stonework was measured, pencilled in, then the XPS was cut with a knife, before deepening the mortar lines with a pencil.  The whole lot was textured with a ball of foil, and several of the stones were pressed in to give a slightly less uniform look.

The components for the stone cabin

I tried using tacky glue to assemble the cabin, but the XPS doesn't absorb it well.  I ended up using a glue gun, which did the job nicely.


The cabin assembled

I added a couple of pillars in the middle of the long walls.  To maintain the dwarven look I went for 5mm deep and 1mm wide, with the corners chamfered.  If Peter Jackson has taught us anything, its that dwarves like octagons.

I glued a card roof in place (the usual postage envelope card) and then tiled it with 2mm thick XPS.  I avoided card as I wanted thicker, hefty stone tiles.  I've also avoided the typical slipped and cracked tiles that typify my human builds.  None of that shoddy roofing from dwarves!

The roof actually gave me a lot of trouble.  My first attempt had the tile strips too close together, so there was an unsightly profile.  I ripped them off and started again, and remembered to add a chimney (just a strip of textured XPS).  Spacing the strips out further looked better, but the edged looked scrappy, so I trimmed them in line with the walls and added bargeboards, again, strips of XPS.  If I were doing a fancier dwarf building these would be ideal for some decorative carving.  The ridgeline was more XPS, fashioned to match the bargeboards.

Cabin front awaiting door furniture

Cabin side

Cabin rear

Window side

The cabin has a coat of mod podge to strengthen it, then its on to painting.

As you can see, the cabin is a good size for dwarves, especially once it has a base.  I still need to find some 'greebles' for the ends of the ridge.  I'm sure I can find something on a sprue somewhere.

Wildspire Miniatures for Dungeons and Dragons

Whilst assembling the minis required for the Master Forge I looked at what is available these days beyond the usual Reaper or Wizkids.   I ...