Tuesday 30 April 2019

D&D Character Minis - Francis (part 1)

I recently started a new D&D campaign.  This time we are using 5th edition and playing in a home brewed world, Teramarr.

New characters deserve new minis, so I'll show off the minis we are using, starting with Francis, the fairly standard human fighter.
Francis is male, and starts with mail armour, shield, crossbow and axe.  I didn't have anything exactly matching that, so it was time to get out the bits box, knife, drill and glue and create something.

I began with the old WotC D&D pre-painted mini, Zhentarim fighter.


This is the mini we used for the first session, as most of the fighter types I could find wore far more armour than this.  It's not a bad mini either, though the sword is a bit bendy, and the colour scheme isn't very inspiring.  I understand that when these minis were made there was a correlation between a mini's rarity and the number of different colours used.  This is a common mini; it actually makes good use of the the three paint colours and the black plastic, but I want better for Francis.

Until I looked closely, I hadn't even noticed the crossbow on the back.  It's a bit puny, and seems to me to hang at an odd angle.

To turn the mini into Francis I had to, at the very least, swap the weapon.  I have loads of sprues of different hard plastic minis, for this project, the Frostgrave Soldiers sprue proved very useful.  
The axe was taken from an arm holding it and the sword cut off the Zhent.  The hand was drilled through and a wire pin inserted that took the axe and its pommel.  

I didn't like the head on the Zhent; maybe it's the 'bunny ears' on the helmet, I don't know, but it had to go.  I also did this so that if or when Francis is upgraded, perhaps if he gets heavy armour, using the same head will tie the new mini into the character.  The new head also came from the Frostgrave Soldiers sprue, so there will be no problem sourcing a new one for 'Francis Mark II'


I wanted to make the mini more obviously an adventurer, so I added a backpack, again from the Frostgrave Soldiers sprue.  There are several pouches and ropes on it as well, but I was happy with just the pack.  I'll keep these in  mind for the rest of the party though.
I wanted to replace the crossbow, but the various ones I tried looked too big and didn't fit well under the pack, so I'll just paint it as is.  I also tried a quiver of crossbow bolts, but it looked bulky and made the mini look cluttered.

So that's Francis, built and waiting for paint.  Once I'm happy that the glue is dried I'll give it all a wash then undercoat it.
Once painted, I'll base on a clear acrylic base, but I'll get the paint and varnish done first.


You can see the complete Francis here.

Saturday 27 April 2019

Bones IV on its way!

According to the latest update, Bones 4 nears the UK.  By now I can't remember what I ordered, so that should be a nice surprise.

Of course, it also means a lot more unpainted Reaper Bones to paint, and I suppose that we will soon be getting Bones V

Friday 19 April 2019

Terrain - The League of Rhordia in a Box

I short while ago I talked about my plans for organising my terrain (here).  Well the first set is complete now; a set of 15mm terrain priciply designed for Kings of War games set in and around the League.  You can see it getting its first play here.  Of course it will do just as well for Kingdoms of Men or any basically human settled lands.  You may note that I have used my Orc's Drift buildings, and eventually I might replace them, keeping them seperate for special games, but that's likely to be a long way off, and if you look back here, you will see that I originally built them for the League anyway; Dragon Rampant Orc's Drift came later.

A nine litre Really Useful Box packed full of 15mm terrain

 So what's in the box?
Hills, as per my chart on the earlier post, a single hill and a four part hill.  I don't think I need to show the construction process (comments below if you want this), I designed them so that the four part hill fits in the bottom of the Really Useful Box in the corners, with the single hill slotting in the centre.
Here they are set up, of course the four part hill is very flexible.


On top of the hills is a tray (actually a slightly modified lid from a box of printer paper) which holds the buildings.  At the moment all my Orcs Drift buildings are in here, so there's plenty of room.  Also in the tray is another box holding the trees and the fences and walls.  Under this smaller box fit the fields and the bases for the woods.  


The buildings in the box are far more than I would want for a standard wargame, but they'l make a great village for a skirmish game.  Here they all are.

I made the fields and woods especially for this project.  They are MDF with texture added.  The woods have a layer of foam board with cut-outs for the individual trees, the fields were designed to be easily surrounded by my hedges (See how they are made here, and I must get round to finishing that tutorial).  After all, no farmer would have crops left to the mercy of wandering wildlife.


I'm planning on replacing the trees with some fruit trees and some flowering trees (cherry?) to give the woods a more cultivated look, but these trees will do for now.

Here's an example of a setup.  I hope it gives the feel of settled farming lands.  I think there's about enough terrain, and that's not the whole box full.

There is still enough room in the 9 litre RUB to fit a few more items.  I can slot some thin items down the side of the tray, such as a pond or some road or river sections, depending on how I make them (I'm currently torn between using felt with paint and texture added, or something more solid along the lines of the fields.  Another field might be in order too, along with sufficient hedging to surround them all.  I'd like to add some random 'colour' bits as well to increase the 'feel' of the place; such as barrels and crates, a cart, scarecrow etc.  Thes just add colour in a big battle and will be ignored for Line of Sight etc, but can double as objectives.

All in all I'm very pleased with this set.  It has the advantage of all being in one box, so is easily found (or lost!) in the loft of shame, and contains all I need for a game.  If I'm doing a skirmish game on a smaller battlefield its fine, the scenery should be more crowded anyway.

Next up will probably be a box of 28mm terrain using a 35 litre box (or maybe the 18 litre if I can get away with it).  I might try some mountainous scenery, possibly dwarven themed since I got a couple of nice buildings recently.  This set will have more hills and some impassable rocks.  Boulder fields will replace farming fields and I'm sure to need a stream.

Thursday 18 April 2019

Kings of War Battle - Gugrot's Revenge Extras, Order of Battle, etc.

Just a little extra post to include Merlin's pictures from the battle, and an order of battle so you know what was what in the AAR here

The Herd survey the village, their ex chieftain is paraded before their eyes

The Herd advance

Bitter fighting in the fields

The Knights ride through the opposition

Here's the League Order of Battle, using the extremely useful Easy Army, check it out if you don't know it.

And the Herd, who also had the Boomstick on the Tribal Totem Bearer


Wednesday 17 April 2019

Kings of War Battle - Herd vs League of Rhordia - Gugrot's Revenge

I had a return visit from Merlin recently and we continued the vague storyline of my League of Rhordia vs his Herd.  Last time he lost, so I decided that his general from the previous battle was being made an example of.  The Herd leader from the first battle had survived though, so clearly he would be after revenge.

The scenario briefly involved the League attempting to try and execute the Herd general from the last game in a village on the edge of the Wilderlands.  There were probably political reasons for this, but it was an unwise choice as Gugrot, survivor of the battle at Froswick Farm saw his chance to take Bas-Ra back, not to rescue him, but so he could face punishment for his failure before his peers.  
Bas-Ra could not move as long as there was a scoring unit within 6".  If he was ever able to move, he would move at normal rate (his chains slowed him down) towards the nearest short table edge, avoiding troops of either side.
Whoever ended up with Bas-Ra could claim a Major Victory, if he escaped then a Minor Victory went to the side causing the most damage to their opponent.

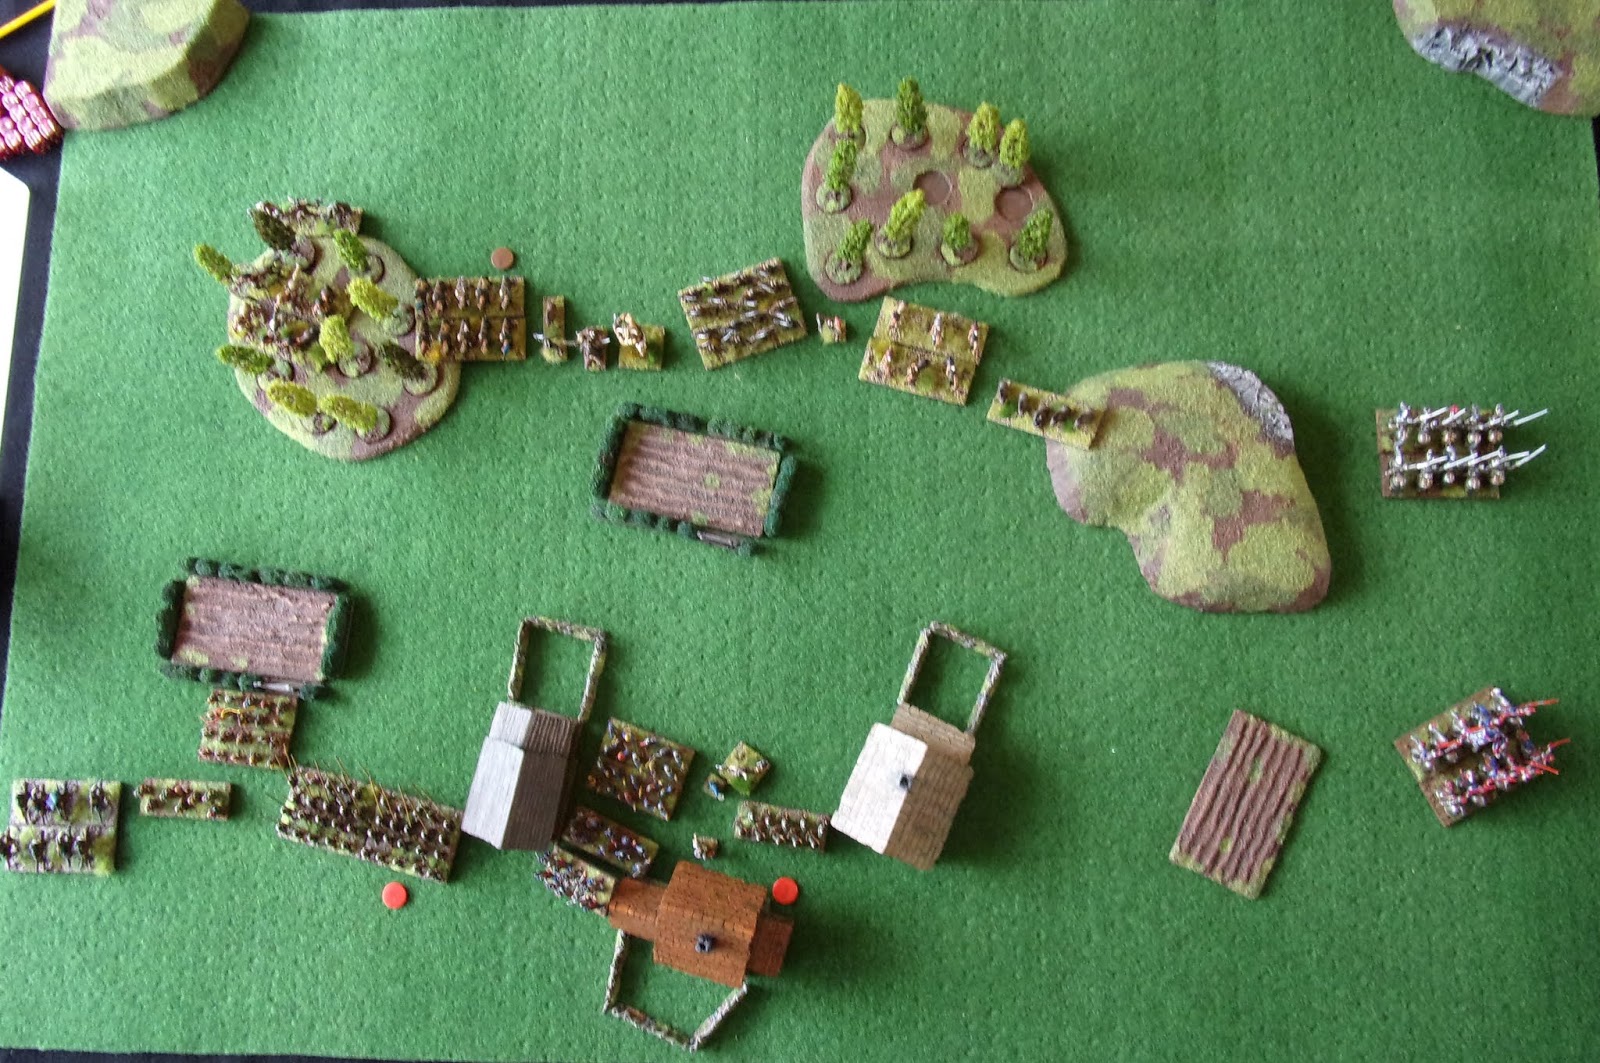
God's eye view of the battlefield

The village of south Elig just prior to the arrival of Duke Errington and the trial of Bas-Ra, ex Herd general.

Looking out to the wild from the village.  

The two forces line up

The Herd, eager to deny the League the chance to execute Bas-Ra

The League, determined to see the Beastlord pay for his crimes

The Herd advance
The Herd advanced, one of the Centaur Brayherds taking advantage of the cover offered by the wood, followed by the Guardian Brutes.  Desultory missile and spell shots caused minor casualties to the League forces, but they just shrugged it off.
making their way through the Wilderlands.

The League tries a flanking maneuver
The bulk of the League army stayed where it was, adjusting it's position slightly in response to the Herd.  The two regiments of Knights rode off in an attempt to flank the enemy.  League archery was little better than the Herd's had been, but Cali Starbrow, Halfling sorcerer extraordinaire, used the arcane power of his spells (and magic 'hat') to blast the huge Brutox back, hurting it in the process.

The Herd continues its advance
 The Beast Pack ranged far out ahead to try and put pressure on the League while the rest of the army sought cover in the fields and woods.  Lucky shots from the Centaurs in the centre of the field, along with the magical power of the 'Boomstick' wiped out the crossbowmen in the village.  The Herd cheered, the rest of the humans and halflings would soon follow.  Encouraged, the shaman brought a blizzard down on the Dogs of War, but it caused only a little damage.  Gugrot, now armed with a bow, proved no marksman and the Centaurs on the flank were unable to touch the Halfling Knights.

The League awaits the enemy
Duke Errington's response was measured.  He accepted that there would be casualties, though the loss of the crossbows so early in the battle was unfortunate.  The Halfling Knights were spurred into action, but the centaurs were too far away to contact.  They hoped to draw them out and disrupt the Herd battleline.  The Household Knights continued their trek around the enemy flank, hoping there would be something left for them to charge by the time they arrived.
Teh Halfling archers softened the Centaur Brayhunters up for their mounted kin.  The halfling scouts drew a bead on the huge Brutox, easily visible beyond the field, and missed.  Cali once more used his magic to push  the Centaurs facing him backwards, the hybrid creatures neighed and cried out in pain as they moved.

The Herd makes contact
 With shouts, cries and bellows the majority of the Herd army crashed into the League.  The Brayhunters charged into the Halfling Knights while the Guardian Beasts rushed up to the hedgerow defended by the Halfling Archers while Gugrot assaulted them from the side.  Both the Longmanes and the Brutox smashed into the Dogs of War.  In the centre of the village the Longhorns charged the City spear Militia, the Centaurs were unable to reach the enemy, but ran forward and eyed Bas-Ra as he struggled against his bonds.
All this action distracted the Shaman, who failed to direct his magical Blizzard successfully; he had hoped to hurt the onrushing knights.  His Totem Bearer proved a better shot with the Boomstick, though the Knight's armour reduced the power of the blow.
The Centaurs on the flank slew a few of the Halfling Knights, but they held firm, as did the City Militia, though more of them fell to the Longhorns.  Several of the mercenaries fell before the combined assault of Brutox and centaurs, but they too held and prepared to return the compliment.
The Herd makes some progress against the League

The League retaliates
On the left flank the Halfling Knights closed the gap with the Centaur Brayhunters whilst in the field the Halfling Archers drew knives and prepared to take down as many of the Guardian Beasts as they could.  Seeing their opportunity, the Halfling Scouts smartly pivoted and charged the Longmanes in the flank, while the Dogs of War charged their front, ignoring the hulking Brutox for now.  In the village Duke Errington made a snap decision.  He suspected that the Beasts he had seen ranging off to his right might be behind the village by now, but the Herd in the centre was the bigger threat.  He ordered his Guard to charge the Centaurs and urged the Militia back in against the Longhorns.  Cali and he held the gap between the Inn and a farmhouse, aware now that the Beasts arrived.  Meanwhile on the right flank, the Red Knights crested the hill and viewed the  battle before them before urging their mounts down ready for action.  Out of sight of the rest of the army, the Red Knights rode up between the wood and the hill.
Cali pushed the Beasts backwards, but his casting was hurried and they only stumbled a few yards and seemed otherwise unaffected.
The Halfling Knights speared several of the Centaurs, but the remainder of the pack held.  Their archer kin were unable to harm the Guardian Beasts and fell back from the hedge.  They knew the beasts would be over soon, and things looked grim.  The mercenaries and scouts fared better, wiping out the Longmanes.  The scouts once more smartly turned ready for the onslaught.  In the village the Militia acquitted itself well.  Though they were unable to wipe out the Longhorns, they killed many of them, and the rest just milled around in confusion.  The House Guard did even better, slaying all the Centaurs, then about facing to prepare for the Beasts.

The Centaur Brayhunters charged into the Halfling Knights while the Guardian Beasts closed once more with the weary Halfling Archers.  Gugrot took his chance and ran into the Halfling Scouts.  in the village the Beasts met the House Guard, the Longhorns looked around in panic, able to little more that face the dangerously close Knights.
Both Shaman and Totem Bearer used their powers to inflict harm on the Knights, but they were unfazed by the magical barrage.
The Beasts gored a few of the House Guard, but the stout warriors held.   Although the Brutox killed only a few of the Dogs of War, they stumbled around in confusion, unwilling to fight further for the while.  The Halfling Scouts lost more of their number to Gugrot, but proved braver than the mercenaries and refused to yield.  Their kin fared less well, falling to the Guardian Beasts who then swarmed over the hedgerow.  On the left flank the Centaurs slew some more of the Halfling Knights, but they held.
The League takes loses

Leveling their lances the Red knights charged the confused Longhorns who were also charged in the flank by the City Militia, the White Knights advanced, unsure whether to go for the Shaman or the Totem Bearer.  On the other side of the village the House Guard waded into the Beasts, greatswords swinging.  Things were going less well for the League on the left flank; the Halfling Knights charged back into the Centaurs, but the Dogs of War began to withdraw.  Shrugging fatalistically, the Halfling Scouts showed their discipline once more and spun round to attack Gugrot.  They knew they had little chance, but if they could slow or stop the enemy general, perhaps their sacrifice would not have been in vain (and if I had remembered they had Pathfinder they might have done a little better.  A little).
Cali tried to get round to see the Brutox.  It was injured and had shown none of the strange healing that it's kin had at Mardale (a very poor run of Regeneration rolls from Merlin), alas the building was just too tall to see the creature beyond.  Duke Errington move into shouting distance of the Dogs of War, maybe he could bolster their courage for the inevitable Brotox attack.
Unsurprisingly, the Longhorns broke under the combined League assault adn on the left flank the Halfling Knights also wiped out their Centaur opponents, wheeling round to face the Guardian Beasts and, hopefully, begin to turn the enemy flank.  The Halfling Scouts were unable even to hurt Gugrot (see earlier comment about forgetting Pathfinder, but it wouldn't have made a difference). The House Guard chopped and sliced the Beasts, but they were too maddened to notice their heavy casualties (yet another double 1 Nerve test).  Duke Errington knew his men held the village, and he was confident they would keep it, and the prisoner, to the end.  But he was worried what damage the Brutes and the Brutox could do, especially to the vulnerable Dogs of War, and Gugrot had yet to be even scratched.  Perhaps he would have to wade in again; he hated getting his armour dirty.
The League fight back

On the left flank the Guardian Brutes took the Halfling Scouts in the flank; they were too engrossed in Gugrot and hadn't seen their danger.  Gugrot growled and moved into the field while the Brutox, miraculously healed, smashed into the Dogs of War.  The stubborn Beasts once more charged into the House Guard.
The Shaman, seeing his danger, targeted the Knights with another Blizzard, but only a few fell.  The Totem Bearer's Boomstick was even less successful, missing completely, as did Gugrot loosing his bow at the Halfling Knights.
Unsurprisingly, neither the depleted Halfling Scouts nor the Dogs of War held, both being smashed into the mud by their bestial opponents.  In the village the House Guard continued to take casualties to the Beasts, but insufficient to worry them.
Before the Herd assault...
...and after, the Halfling Scouts and the Dogs of War destroyed

Duke Errington ordered his troops to protect the village, he knew it was now safe, but he had to do something about his left flank.  The Halfling Knights couldn't hold out much longer, and there were some fierce opponents still there.
North of the village the Red Knights charged the Shaman, while the White Knights charged the Totem Bearer.  The Halfling Knights desperately charged Gugrot.  They had seen all their kin destroyed by the Herd, would they fare any better?  The House Guard once more charged into the Beasts, determined finally to wipe them out.
Cali wisely retreated over the fence behind the inn,  He aimed his spell at the Brutox, but the Wind Blast was weak and the huge creature merely stepped back a few paces.
The House Guard pulled down the last of the Beasts and pivoted back to face the village square and the prisoner.  The White Knights easily rode down the Totem Bearer despite losing impetus charging through a hedge, unfortunately their Red Brethren blocked their way onward to the Shaman.  The Red Knights charge hurt the Shaman, he still stood, but his head spun and he couldn't concentrate.  The halfling Knights injured Gugrot, but it was just a scratch.  In dismay they backed off, they knew he would be after them next.
The Knights' charge
and its aftermath.

Enraged, the Brutox charged the Halfling Sorcerer hiding behind the fence.  Teh Guardian Beasts turned to face the threat of the Knights, while the Shaman, too dazed to do anything else, retreated back towards the woods.  Gugrot could see his plans fading away like morning mists.  The men were destined to keep Bas-Ra; he no longer cared.  Now to destroy these annoying half-men and then vanish.  He would have his revenge one day.
The Brotox, clearly unused to man made fences, was unable to hit the Sorcerer (though afterwards Merlin realised the Brutox had Strider, doh!), and backed off, confused.  Gugrot fared better, trampling the last of the Halfling Knights beneath his hooves.
The Herd's final throw of the dice

With an impressive display of horsemanship the Red Knights charged the Shaman, pulping him into the mud near the woods.  Timing their move to perfection, the White Knights charged the Guardian Brutes, but they were hindered by the hedges, and did little damage.  Cali once more blasted the Brutox back.
The League's final charges.

Few left on the fields of slaughter, but more League than Herd.


The triumphant League hold the village
Duke Errington surveyed the village and its surroundings.  This should have been a simple exercise in justice; a demonstration to the locals of both the dangers of the Wild, and the power of the League.  Well, at least he had shown that power today, though at great cost.  Apart from Cali, the mysterious sorcerer, all the halflings had been wiped out.  This was becoming a habit.  If he wasn't careful, the Halfling elders would refuse his calls for aid.
Still, the Wild was beaten back again, at least for a little while.

The remaining Herd decide they've had enough

Looking back Gugrot could see the pillar of smoke rising from the village.  The humans and their unnatural half man allies were burning Bas-Ra.  He called out and the rest of the Herd, what remained of it, withdrew to fight another day.

This was always going to be a tricky game for Merlin, thinking about it now it would have been fairer if Bas-Ra had been placed as an objective in the centre of the table, with rules for releasing him, and the possibility of him escaping a capturing unit.  Still, the advantage was supposed to be mine, a continuation of last game's story line; just, perhaps, not quite so much of an advantage.
Regardless, we both had a great game, and I'm looking forward to what Merlin has cooked up for me in the summer.  I just hope the Halflings of the League don't decide to hire my new ogres and start a halfling uprising against Duke Errington.

This battle saw a couple of (minor) firsts; our first 1500 point battle with either of these armies, so we were still getting to grips with how they work best, and the first use of my League of Rhordia terrain set.  As I mentioned recently, I'm building themed sets which fit nicely into boxes, I think it looks pretty good. I'll do a post about it soon, there are still a few little bits to adjust and add to.

I've got the orders of battle and a few extra pictures on a seperate post here

Tuesday 9 April 2019

A Box of Wargaming Terrain

I've been doing a fair bit of sorting out of my gaming stuff recently.  In fact I am reassessing what I play and what I need to play it, with the intention of thinning out my stuff and having coherent collections.  One aspect of this is terrain.

I have mentioned several times recently that I want to have a good look at what terrain I have and how I use it.  One problem is that I have a lot in various boxes and piles, and I can't always find it when I am preparing for a game.  It seemed a good idea years ago to put all my trees in one box, but now I can't find that box, so I have to do without trees (or use the few scruffy ones I can find, along with odd scaled models).
I also like to theme terrain to a particular army or location.  When everything is lumped together, or spread across the house, it becomes difficult to maintain this coherent look when setting up a battlefield.
Finally, in the past I've been less than good at storing my stuff, (hence why a lot has gone missing) so quite a bit of terrain has been damaged.

I'm trying to address this, so I've decided that I will have a series of boxes of terrain.  Each one will be built to a theme, so when I want a game, I just have to grab the relevant box.  I'll organise each box so that there is a surplus of terrain.  If everything is on a 6 foot by 4 foot table, it will be cramped for a normal wargame such as Kings of War, the idea is to choose items from the box, say about 75% of them.  However, for skirmish games like Vanguard, where denser terrain is good, simply put everything on a smaller table.

When I was a printer, my boss used to say 'Preparation Prevents Pretty Poor Performance' (well, he didn't say 'Pretty', but you get the idea).  So I have scoured T'interweb and various wargames books to come up with lists to guide my terrain collecting and building.  Useful resources include Epic Dwarf for the amount and general size of terrain pieces (though definitely not the set up as it's far too random for my liking), and the Battlefield chapter in my battered sixth edition Warhammer Fantasy Battles book for ideas for theming terrain.  Here's an example of the list I drew up for a League of Rhordia themed terrain set. The list shows the maximum for a set, a normal battlefield might have less items on it.

RHORDIA
No.
Item
Size
Height
Special
Notes
1
Hill
12” x 9”
1
-
Rounded, grassy
1
Multipart hill
16” x 12”
1 or 2
-
Four part for edge/corner use or one large hill
2
Woods
9” x 9”
3 or 4
Difficult
Deciduous trees, orchards
3
Hedges or fences
3 x 4” long sections
1
Obstacle
Hedges or fences
2
Fields
6” x 4”
0
Difficult
Crops, poss with hedges/fences
1
Building
8” x 6”
3 or 4
Impassable
Villa, inn etc. or Halfling home
1
Building
6” x 4”
2
Impassable
Farm, barn
1
Building
6” x 6”
5
Impassable
Tower/fort
1
Water
6” x 6”
0
Diff/ Imp
Duck pond or lake
NB dimensions given in scale inches, so the pieces will be smaller for a 15mm terrain set.

The idea is that the terrain gives the feel of a settled rural environment, just ripe for an invasion of Herd, Orcs, Ogres or similar.  In fact, I'd do a very similar set for my Kingdoms of Men.

I decided to begin the project with this set of 15mm terrain as that is the stuff I have the least of, and despite being mostly recent purchases or builds, its a very rag-tag collection.
I've got some of this already.  All the buildings are already built, and you can see an example of one here.  Likewise I've already build a good number of hedges (see here for how I did it) and I painted up some comercial fences a while back.  I have some of those cheap trees from China via eBay which will do.  Eventually they will be moved to an Ancient Greece set as I have some orange trees and trees in blossom on the way. I will make bases that delineate the woods, a pond should be easy, and then there are fields and hills to build.

I've planned the whole set to fit inside a 9 litre Really Useful Box, so the hills are cut so that they occupy a layer at the bottom of the box and everything else sits on top.  The multipart hill fits nicely in the corners, and the single hill sits in between.  When I come to do a set for 28mm I'll simply scale up and use a bigger box.

I've tried setting this lot out on a table using paper templates for the various items, and I think it looks OK.  I'll tweak things a little, so for instance I'm going to make the fields so that they can make one large or two small fields, and the hedge sections will fit around them if I want.  I might also make extra woods and fields if space allows.  I'll certainly do a few extra decorative pieces that have no effect in the game (or can act as objectives, especially in skirmish games, such as gallows, signposts, piles of sacks or barrels and the like.

You might notice that there is no running water in the set.  That's because I'm not quite sure how I would do it, though for 15mm I might just use blue felt painted and with some rocks etc.  I'm sure to need a river or stream in a later set, or even as a late addition to this one.  I'll do roads in a similar manner, just using brown or grey felt, but since they have no effect in the rules I use, they aren't a top priority.

I'm hoping to get this lot done pretty soon, especially since I have a fair bit made already.  I'll post my progress soon.

*EDIT* Here's the completed League of Rhordia box of terrain.

Monday 8 April 2019

Kings of War - A New 15mm Army

Recently a few people have asked me what minis we use for 15mm KoW.  The answer depends on the army, of course, but there is now a reasonable range available.  The more 'niche' and Mantic specific armies don't tend to be covered, but pretty much everything else is.  Personally I use Essex for most historically based armies, such as the human troops in the League, and I'll look at their earlier Medieval ranges if and when I do a Brotherhood force.  Their halflings are good too.
Both Magister Militum and Ral Partha Demonworld do very nice 15mm fantasy, and there are many more.  If you want to know more, check out the 15mm Fantasy facebook group.

With one exception, or so I thought.  Having been awed by the sheer number of attacks Ross' hordes of ogres could put out for a small frontage (especially deadly two against one vs orc hordes) I was thinking about getting some for 15mm, but I couldn't find a range that nicely covered the options in the army list.  Then I literally stumbled over the answer.

Many years ago Merlin and I discovered the Caesar Miniatures range of 1/72, or roughly 20mm, historical figures and collected quite a few of their ancients range for Warhammer Ancient Battles.  I still have a half painted Assyrian army, and quite a few Greeks.  Then Caesar brought out a fantasy range, and it would have been rude not to get any.
Caesar miniatures first box of orcs (random image form internet)

Of course, it was an impulse purchase, or purchases, as we never really got round to doing anything with them.  I had quite a collection of the goblins and orcs boxes, about a third painted, but since I had O&G in 28mm and 15mm they just got boxed and buried, until I knocked the box over.

I didn't see orcs, I saw Ogres.  20mm orcs would make great ogres.
I had two or three boxes worth, some painted with green skins, so I set out to see how well they covered the army list.  Pretty well it turns out.  There are some options not covered, but I knew that Caesar had done a second set of orcs, so I ordered one of those to bulk out and add variety.

I began with a test unit of the least armoured of the orcs.  They would do as the Berserker braves.  One of the sculpts has two weapons, a club and an axe, the other has a spiked club.  In the past I carefully cut off one weapon from the dual wielder, along with the fancy top-knot off most of them.
Ha, a quick read of the KoW list suggests that the berserker braves have two weapons.  I might do some pinning later.  I had originally planned to save one of the top-knotted minis as a shaman, or Warlock for the KoW ogre list, but when set two arrived it has a far nicer warlock mini.  In fact the whole set is generally nicer.  The figures are in some respects cruder; the first set has a much smoother finish, but the second set has far better detail, down to wrist bands with teeth in them.  The only thing that isn't so great is the prominence of the mould lines.
As I wanted to add extra weapons to the berserker braves I went straight on to a horde of warriors and a couple of heroes (Warlord and Warlock).  Here they are, painted and based but awaiting texture and varnish.  I have plans to add a little something to the base to emphasise the scale.

A horde of Ogre warriors

Ogres facing humans.  They look suitably large

Ogre warlock and warlord

To help me remember, here is my ogre flesh recipe.  I deliberately went for reddish skin tones to link them to Mantic's official ogres.
Base coat VGC Terracotta, wash AP Dark Tone, highlight with base colour then up through Gory Red to Blood Red, extreme highlights Fiery Orange.

Of course this doesn't quite cover all the army list entries.  I'll have to do some conversion work for the hunters and for both missile types, and there aren't any red goblins, but plenty of manufacturers do goblins (see above).  It's just a matter of choosing a make, and selling a bit of stuff on eBay to fund them.

You may well ask why I need another army?  Well I currently only have one workable KoW army in 15mm, and I like to have two so I can get people playing.  I am gradually working on Varangur, basing the 'normal' troops on my Scythians, but it seems to be a slow process, especially as I am unsure what to use for many of the units.
Ogres are ideal as the second army as they are relatively few in number, and being neutral, can fight with or against any other army.