Monday, 29 June 2020

Fighting Apathy 5 - Mantic Kings of War Krudger and Trolls

The demo orc army continues apace.

I assembled the trolls and the Kruder whilst earlier minis were drying.  I use yacht varnish to give a good clear protective coat, and it needs a good 24 - 48 hours to dry properly.

As with the orcs, I've given the trolls different skin tones.  Rather than use the 'basecoat, highlight, wash' technique, I've painted these in a more traditional manner, with a certain amount of blending for the highlights.  If anything, I think they look a bit too clean, and I may add some rust to the metal later.
As with the rest of the army, everything is getting based at the end.


The orc army set I got doesn't contain a Krudger to lead them, but it does have a Flagger.  I've already got a couple of Flaggers in my old orc army, and a couple of the Krudgers too (you can see one of them here in my Vangard warband) so I used the Flagger body as the base for a Krudger conversion for a bit of variety.  Nothing too spectacular; just swap the flag for a plastic arm with axe and the hand with a sword for a plastic hand with shield.  Both the flag and the sword are separate parts, so no cutting of the metal required, though the new plastic arms both required some trimming to fit, and I had to rebuild the elbow armour on his right arm with greenstuff. I was going to add some plasticard spikes and riveted on repaired sections, like the shields carried by the gore riders, but I couldn't find my plasticard.  I may go back and add something later to make the shield a bit more impressive. At some point I'll also use the metal flag and sword on a plastic orc body to make another, slightly different, Flagger.

As with the trolls, I used washes and tried blending highlights on the Krudger. There's nothing too spectacular about him.  The cloak  is lighter than I had planned, but I rather like it now.

He has a friend as well.  I've held off from painting any orclings in the past as I felt they were a bit on the small side for me to do them justice.  However, I realised that they are pretty much the same size as the red goblins I have been happily painting for my 15mm ogres, so I simply used the same techniques on this cheeky chap.  I do like the pose, mooning the enemy while safely close to his boss, and I might even use some of his friends as red goblins when I go back to that army. 


That's four of the six 'slots' of the demo army painted, though all the basing is still to do.  The remaining two units, gore riders and morax, are built and I have already started painting them while the gloss varnish was drying on the trolls.

EDIT: You can see these jolly chaps finally based here.

Tuesday, 23 June 2020

Fighting Apathy - 4 - Mantic Kings of War Orc Ax

Continuing to try to keep this a manageable project, the next job was half the regiment of orc ax.  With the skulks I found 8 to be a very doable chunk, so I built up 8 orc ax, including the command, while the gloss varnish was drying on the skulks.

The orcs themselves were straightforward to paint, following my usual system and keeping pretty much to the colours I chose for the skulks.

Whilst the first eight ax were drying from the shade wash I assembled the next eight.  These were then painted while the gloss varnish dried on the first lot.  Once everything was at the gloss stage I added eyes and a skull on the shields.

In the pictures below the minis on the square bases are from the first lot, the ones without are from the second batch. Everything gets based at the end as I'm experimenting with something.


I also managed to assemble a Krudger and the trolls while this lot was drying.  Working to a system like this has helped me plod on through the project. Now I've got a troop and a regiment done, bar basing, and am well on the way with the next lot of stuff.

EDIT You can finally see them based up here.

Thursday, 11 June 2020

Fighting Apathy 3 - Mantic Kings of War Orcs - Planning and Skulks

As I mentioned previously, I'm trying a new project in the hopes that I can break out of my current hobby slump, this is my current idea.

I've long wanted a box containing rules, two armies, a bit of terrain and dice. Everything to just lend to interested people to start them playing.

When I was a Mantic Pathfinder I had a painted starter set of Dwarves and Undead. The dwarves are fine; solid and dependable troops, but the undead aren't the easiest army to learn to play with, and besides I prefer Orcs.  Perhaps a dwarf and orc starter set would be better?
When Mantic released a free set of Kings of War rules, complete with two sample armies, I was delighted to find they were Orcs and Dwarves.  This was clearly A Sign.

I was originally just going to raid my existing orcs, which contain nearly all the models I would need, and add a couple of units to the starter set dwarves. However, my existing skulks are actually GW Lord of the Rings orcs, and ideally for this project both armies would be all Mantic models.
While browsing eBay for skulks I 'accidentally' ended up with some Mantic orc bargains. Now I had more than enough to do all the orcs from scratch if I wanted, with the advantage that if the dreaded apathy hits again, I can just go back to my initial plan to raid my existing army.

The sample orc army consists of a regiment of ax, a regiment of gore riders, a regiment of trolls, a troop of skulks, a troop of morax and a Krudger. I'm starting with the skulks as they are the one unit I really want that isn't in my existing army.

The Mantic skulk box contains ten plastic orc infantry with sufficient metal parts to add bows and quivers to each one. Some have additional arms drawing the bow, and there are also some heads with hoods, the plastic infantry mostly have helmets.

Now I'm a Yorkshire man, so I wondered if I could spin the one box out to make more skulks in the future. I've already decided that the orcs will be reduced model count units, I'm aiming for troops of 8 infantry. I then looked for potential donors for extra bows as I was thinking about building four skulks straight from the box and supplement them with four ordinary orcs just with bows on their backs.
An obvious source of bows is Mantic's goblin sprue. The goblin bows are smaller than the metal skulk bows, but not hugely so. Checking the rules I see that skulks now have short bows, so I'm happy with the goblin bows. In most cases I cut the goblin bow off including the hand to make it easier to attach to the orc.
I also noticed that skulks are De 3+. Orc axes are De 5+. Leaving off the shields will make them look closer to De 3+, but I'll also paint some of the many armour plates to look like leather armour.
In the end I spread the metal bits around the models and greenstuffed some fur on some of them to make them look more like hunters, and to cover up some of the shoulders where I'd removed some of the armoured pauldrons.

The paint job was quite straightforward. I used my 'basecoat, highlight and wash' method, with an extra black wash on both the metal and armour before highlighting. I also used three slightly different green skin tones in line with how I am now approaching orcs and goblins.
The troop is still to be based, I'm waiting for some MDF to be delivered to make bases from.  I'll base all the orcs at once, and I have had a few ideas how I want to do this.  I'll do a post showing this when the time comes.

I think this is my favourite skulk, I like the almost diffident way he holds his bow. He has a metal quiver and head from the skulk box, the bow is from the Mantic goblin sprue

Another skulk with a metal head, the arrow is scratchbuilt and he holds another goblin bow

The skulk leader holds yet another goblin bow. Note the claws of whatever beast the furs came from.

Group shot from above showing the fur 'capes'

The full troop of skulks

I'm pleased with the results. I think I've managed to get the skulks looking distinctive. The choice of just eight minis meant I could get everything done before I lost the impetus. Given that I can get away with eight infantry for a troop I think I'll chunk the rest of the orcs similarly.

EDIT You can finally see them based up here.


Wednesday, 10 June 2020

Fighting Apathy 2 - Thinking Outside the Box

Last week's ruined walls really helped me, partly because it was a quick project that gave results, and the ruins will be useful for several different games.

I was still finding it difficult to actually sit down and complete any of my current ongoing projects. The five box system works well under normal circumstances, but these are not normal times.  Now I'm finding the thought of going back to any of the boxes puts me off the idea of doing anything. Everything seems to be part of a huge project that, in my mind, and at my current pace, I'll never finish. What should be a helpful guide has become a suffocating straitjacket.

My little diversion with the ruins recently helped. It showed me I could still do short projects and that perhaps something different might help.

So I'm going to try just that. Something small(ish) and a break from the five boxes. In fact I wonder if I've let the boxes get out of hand with just too much in each that they rarely got emptied.

I'm not sure yet how long this will last (or indeed how long I can sustain my enthusiasm) but I'll show you how I'm getting on tomorrow.

Wednesday, 27 May 2020

Ruined Walls and Fighting Apathy

Like many hobbyists I've been struggling to motivate myself these last few weeks.  I know that some people have really grasped the current situation and got on with some great painting and building, but many others have found that the lack of structure to the days, and the lack of concrete goals or targets for finishing a project have killed the desire to get stuff done. There are other issues involving anxiety and depression, which the current times certainly don't help with.
I usually have a project (one of the five boxes) which is geared towards getting stuff on the table for the next battle with Merlin.  Now we have no idea when this is going to be, so that deadline has vanished.
I've tried several times to get one of my ongoing five projects finished, or even just a bit further along, but I've really struggled (I've not been idle - I've been playing a lot of music, but that's not what this blog is about).

Anyway, working on the theory that we will eventually be able to do some face to face gaming, I found a quick and easy project that I hope will get me back in the groove.

I've pretty much ignored the five boxes I try and stick to. I appreciate the system is designed to help keep me on track, but I've been so far off track that anything, especially something that gives a quick result that I can be happy with, is what I'm aiming for.

So, walls.  Ruined walls with lots of different applications.  I've made ruined walls before, but this time I wanted something maybe a little more substantial.  I was inspired by the following build from Black Magic Craft, but with a few alterations.
I chose a smaller block size, partly as I had in mind that these might work for both 28mm and 15mm, and partly as I think a lot of these sort of terrain pieces can look too large scale.  Fine for ogres, but if you look at the blocks next to a human mini they are pretty huge. Fine for grand fortifications or temples, but I wanted to use these for smaller buildings.
I didn't stick to the 3 inch units as I'm not looking to use them as walls for dungeon tiles as the video does.  My blocks are (approximately) half an inch long by a quarter of an inch high and wide. I cut lots of quarter inch square strips of XPS on my Proxxon, then cut bunches of them into half inch lengths. The wall sections are half an inch or two blocks wide.

Rather than follow the BMC method for texturing the blocks I used the 'stones and can' approach.  This is simply to put the foam blocks in a can or box, add some sharp stones and shake.  This provides a great texture for a lot less effort, and rounds the block edges suitably as well.
I also used crafting glue rather than hot glue, as my hot glue gun is on the hot side of hot, so easily melts the XPS. I was worried that the walls would take ages to dry, and that they wouldn't be very strong.  Fortunately its warm at the moment, and they dried nicely over night.

Four ruined wall sections awaiting painting etc.

The next stage was to trim the bases and then cover everything, including the underside of the bases to combat warping, with the BMC black paint and Mod Podge undercoat.

Once that was dry I used thinned PVA glue to stick a coarse mix of grit and sand to the base, then sealed that with more PVA watered down and with burnt umber craft paint added.

The walls themselves were given a base coat of a dark grey (actually a test pot for emulsion paint - it's what I had at the time, but coverage isn't great), then I picked out a few stones in light grey, tan and an even darker grey.

Once that was dry it was given an all over heavy drybrush with a sand colour, including the base.

A thin black wash helped darken everything, and then I sponged on some dark green, especially lower down the walls, for moss.

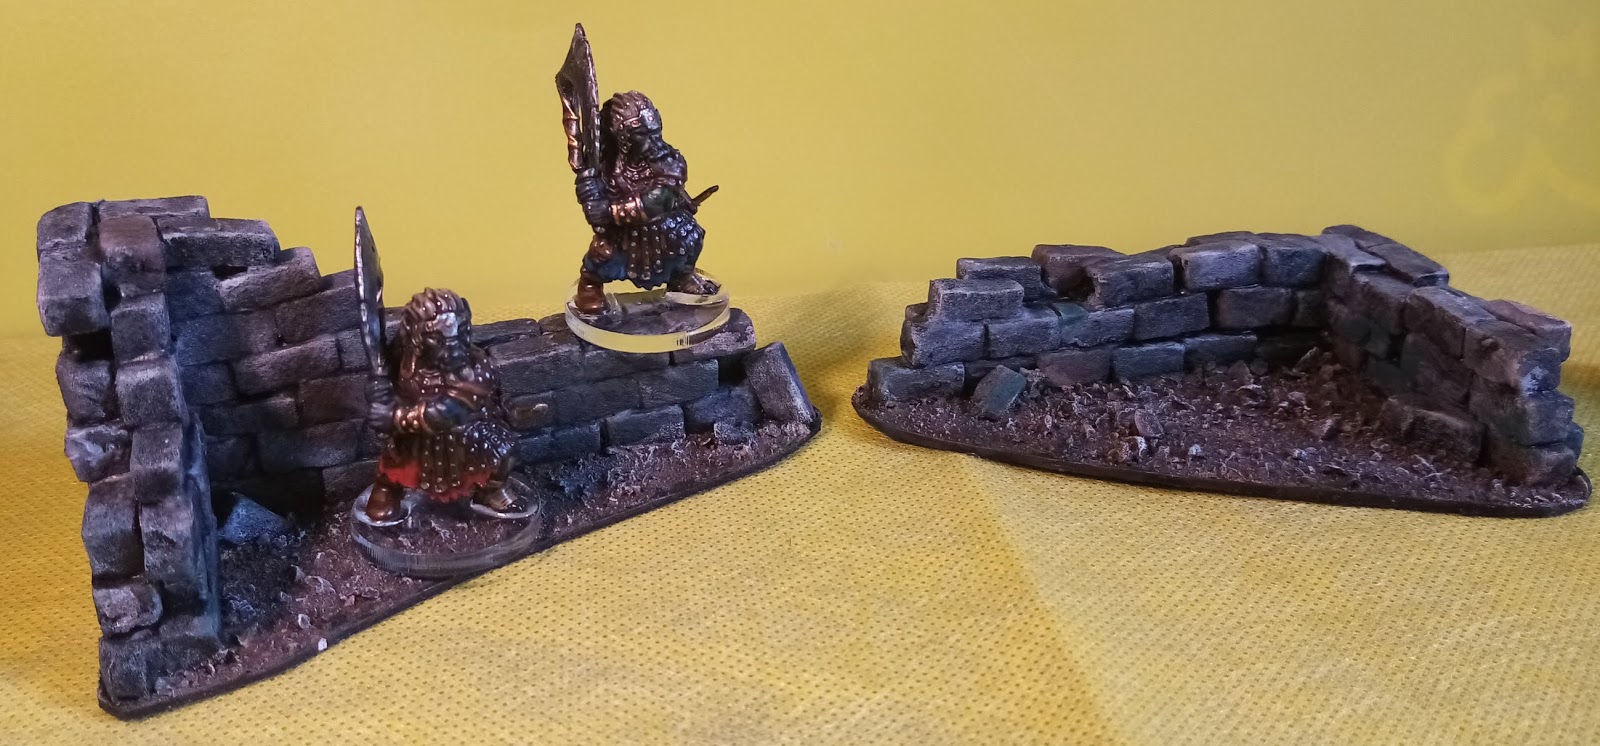
Finished ruins


Orc's exploring the ruins

I could add some vegetation to the bases, and even in the cracks in the walls, but they'll do for now.

I'm pleased with these.  The project was short (a few hours over two days) and I've produced something useful. They will work for many battle games, especially skirmish games such as Frostgrave and Lord of the Rings Strategy Battle Game.  One main factor in making them was the need for something to show ruins in my next face to face Dungeons and Dragons game.  A ruined fort features in the game, and I wanted something to indicate the outer walls.  These should do nicely.
I'll see how well 15mm minis work next to them, they may look good as the ruins of some impressive castle or something.

Sunday, 3 May 2020

Remote Roleplaying

I tend to focus on here on my painting, modelling and wargaming, but I've covered role-playing as well. I've covered my slow accumulation of monsters for Dungeons and Dragons as well as building various types of terrain and floor plans, indeed, one of my five boxes is dedicated to just such projects.

In the current climate, face to face gaming is clearly impossible outside the household, so what is the answer?
For roleplayers there are several options, and I have been experimenting with some of them with/on my Thursday night group.

The most important requirement is a good way of communicating. Text only can work, but voice is better. Images are even better, but nothing will quite beat actually sitting across from someone. There is always a slight lag, that embarrassed pause straight after someone starts speaking when they realise someone else is also talking.

For our first session, which was mostly to introduce the game and create characters, we simply used Zoom. I offered the standard array method from the Players Handbook, though I was happy for players to roll ability scores if they wished. Some did, and no super powered characters emerged, I do trust them.

For the second session we tried Roll20. This seems highly thought off, and offers a lot of functionality. It's free too, though I seemed to need the subscription to add my own maps. Players only need the free profile though.

I didn't set out to use everything the system offers; my aim was to rely on it for communication, dice rolling and showing maps. I wasn't bothered about such things as initiative tracking or lighting effects. I may investigate these in the future, but I want a good understanding of the basics first.

I created maps for the first adventure using Dundjinni, a great tool for producing maps and floorplans (you can see it being used for my sewer tiles here). Sadly its no longer commercially available, though every so often rumours spring up that it is about to be relaunched via Kickstarter. I then exported them into Roll20. Since I had to borrow a laptop for internet access, this meant copying via USB stick. I then went back and trimmed the images and reloaded them, then realised I had them in the wrong layer, so had to correct that, then I realised the maps covered too large an area for the grid, so I went back and chopped the maps into smaller sections and reloaded them again. By this stage if I hadn't had players ready and wanting to play I might have quit.

But I persevered. Initially we had problems with the sound, faint and tinny. So we used Zoom again, much better.
Unfortunately, one of the players struggled to get Roll20 to load, so had to rely on verbal descriptions. Although since I couldn't get more than the first map to load, soon everyone else was in the same boat. The dice roller proved very useful, for those who could access it.

We managed the set up plus three encounters in just over two hours; quite a bit of time was lost at the beginning.  The adventurers are just about to explore a mysterious underground ruin in search of kidnapped tribesfolk.

Before the second session, I went through the tutorial again, and felt I had a slightly better handle on how it worked.  I re-edited the maps so that each room had it's own page.  This was mostly to avoid having to worry about the 'fog of war' feature.  Even so, I started without being able to display maps other than the initial village map (created on MS Paint).  Since I can't see what the players can, I was unaware of this, but was able to correct it.  Easy, once I had figured it out.

The rest of the session went well and all players were able to access Roll20 this time.  My decision to put each room on its own page wasn't so smart.  Once the party started splitting up I had to keep switching pages.  I determined to redo the maps (again!) and experiment with the 'fog of war' for the next session, learning all the time.  The steps you take don't need to be big as long as they are in te right direction.

For the third session the redone maps worked well.  Using the fog of war was fun but I still need to work on 'pinging' and I hope to use tokens for monsters and heroes soon.

I may have started this sounding rather negative, that just represents the frustrations of coming to grips with, to me, very new technology. The actual play experience was great fun; we have now completed the first adventure, and the characters are now 2nd level, though the rogue was lucky, nearly been taken out with the instant death rule (one hit point short) after a critical hit.

Unfortunately, the characters are all now under a taboo and must ritually cleanse themselves to be able to reenter their village.  This, of course, will be the next adventure, for which they will be joined by a fourth character.

If anyone is interested, I'll do a brief post about the design decisions I made when writing the adventure, just leave a comment below.

Thursday, 23 April 2020

10mm Lord of the Rings Orc Tests

If you read my earlier post, you'll know that Merlin and I are working out a 10mm variant of Games Workshop's War of the Ring game. Of course, to play this we need minis, probably more than a few. I've picked a few up on eBay to do some practice on, and I'm happy with my Gondorians (here). Now I've started work on the 10mm orcs I already possess.

If you know the Copplestone Castings range you know they mostly come in strips of 5s. I've done some separating to enable me to keep to the eight infantry to a base used in War of the Ring. It doesn't really matter, we won't be removing individual minis to mark casualties, but more importantly, every four purchased companies get me a free one.

As you may know, I like my orcs to have a mix of skin tones (check out my Dragon Rampant orcs here). Tolkien describes orc flesh as, variously, sallow or swarthy. Some even as black. So this company is a test to see what colours work.


So I remember what I was doing here, there are four different skin colours and two different washes (Army Painter Soft Tone and Strong Tone).
The skin tones are Vallejo Game Colour Heavy Charcoal highlighted with VGC Cold Grey, VGC Heavy Grey highlighted with VGC Rotting Flesh, VGC Cold Grey highlighted with VGC Stonewall Grey and VGC Desert Yellow highlighted with VGC Moon Yellow.
Metals were VGC Gunmetal Metal, washed with black and tunics were the undercoat, Vallejo German Green Brown Surface Primer, highlighted with VGC Khaki.
My Gondorians use Desert Yellow as the base coat for wooden items, so I went with the darker VGC Leather Brown.

I'm pretty pleased with the results, and a quick ask for feedback on the Wargamming in Middle Earth FB group was positive. I still want to try some more tans and browns though, so I may well do a second test company.  I'll also not try to have quite so much variation in one company, its not United Colors of Mordor. As for the was, I might go half and half, as neither quite do what I want.

October 26 The Last Gasp (Ogtober and Orctober)

As October hurtles towards a close, here's the final batch of minis from both the month's projects.  There's only a bit to show,...