Wednesday, 27 May 2020

Ruined Walls and Fighting Apathy

Like many hobbyists I've been struggling to motivate myself these last few weeks.  I know that some people have really grasped the current situation and got on with some great painting and building, but many others have found that the lack of structure to the days, and the lack of concrete goals or targets for finishing a project have killed the desire to get stuff done. There are other issues involving anxiety and depression, which the current times certainly don't help with.
I usually have a project (one of the five boxes) which is geared towards getting stuff on the table for the next battle with Merlin.  Now we have no idea when this is going to be, so that deadline has vanished.
I've tried several times to get one of my ongoing five projects finished, or even just a bit further along, but I've really struggled (I've not been idle - I've been playing a lot of music, but that's not what this blog is about).

Anyway, working on the theory that we will eventually be able to do some face to face gaming, I found a quick and easy project that I hope will get me back in the groove.

I've pretty much ignored the five boxes I try and stick to. I appreciate the system is designed to help keep me on track, but I've been so far off track that anything, especially something that gives a quick result that I can be happy with, is what I'm aiming for.

So, walls.  Ruined walls with lots of different applications.  I've made ruined walls before, but this time I wanted something maybe a little more substantial.  I was inspired by the following build from Black Magic Craft, but with a few alterations.
I chose a smaller block size, partly as I had in mind that these might work for both 28mm and 15mm, and partly as I think a lot of these sort of terrain pieces can look too large scale.  Fine for ogres, but if you look at the blocks next to a human mini they are pretty huge. Fine for grand fortifications or temples, but I wanted to use these for smaller buildings.
I didn't stick to the 3 inch units as I'm not looking to use them as walls for dungeon tiles as the video does.  My blocks are (approximately) half an inch long by a quarter of an inch high and wide. I cut lots of quarter inch square strips of XPS on my Proxxon, then cut bunches of them into half inch lengths. The wall sections are half an inch or two blocks wide.

Rather than follow the BMC method for texturing the blocks I used the 'stones and can' approach.  This is simply to put the foam blocks in a can or box, add some sharp stones and shake.  This provides a great texture for a lot less effort, and rounds the block edges suitably as well.
I also used crafting glue rather than hot glue, as my hot glue gun is on the hot side of hot, so easily melts the XPS. I was worried that the walls would take ages to dry, and that they wouldn't be very strong.  Fortunately its warm at the moment, and they dried nicely over night.

Four ruined wall sections awaiting painting etc.

The next stage was to trim the bases and then cover everything, including the underside of the bases to combat warping, with the BMC black paint and Mod Podge undercoat.

Once that was dry I used thinned PVA glue to stick a coarse mix of grit and sand to the base, then sealed that with more PVA watered down and with burnt umber craft paint added.

The walls themselves were given a base coat of a dark grey (actually a test pot for emulsion paint - it's what I had at the time, but coverage isn't great), then I picked out a few stones in light grey, tan and an even darker grey.

Once that was dry it was given an all over heavy drybrush with a sand colour, including the base.

A thin black wash helped darken everything, and then I sponged on some dark green, especially lower down the walls, for moss.

Finished ruins

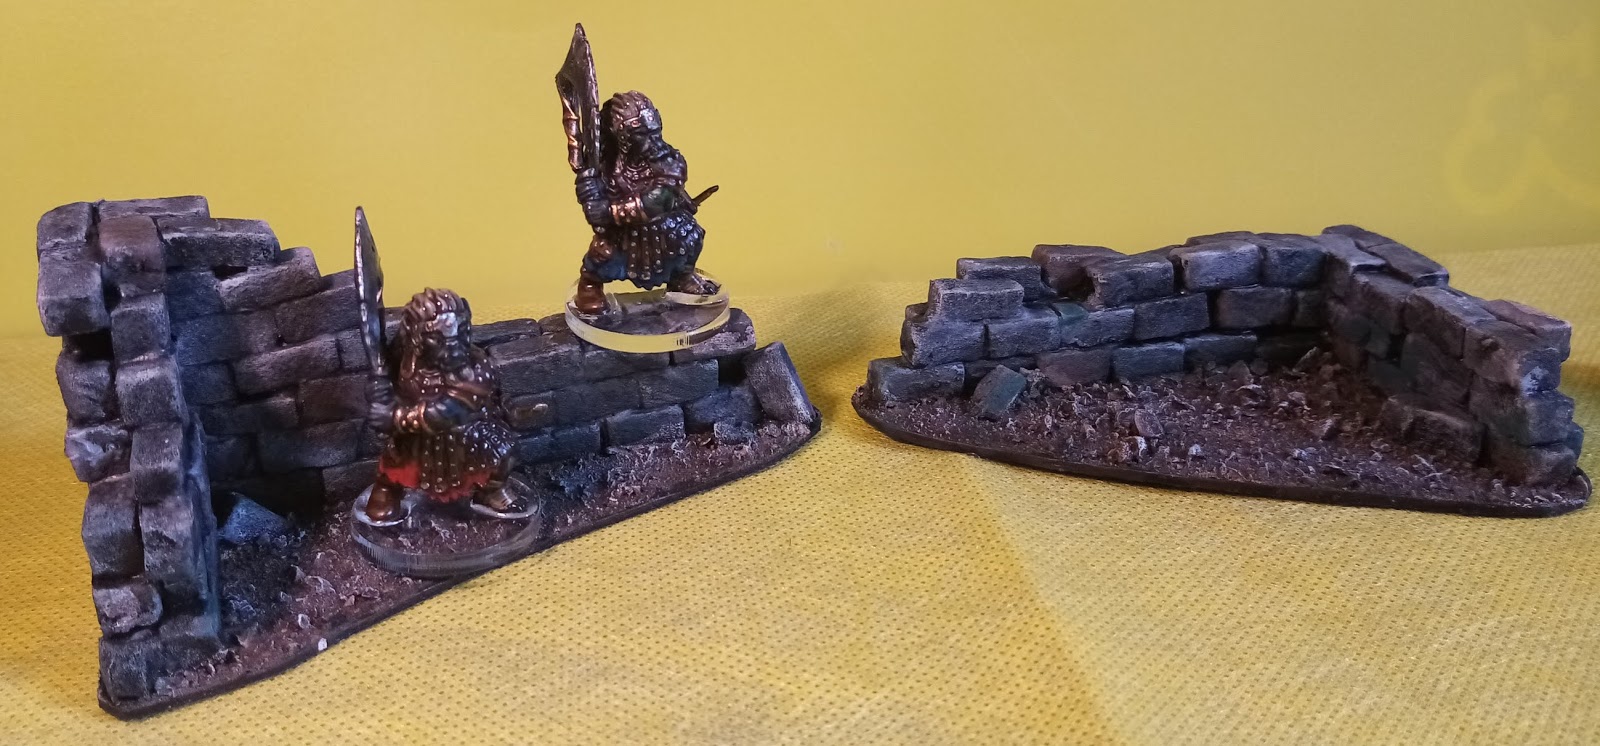
Orc's exploring the ruins

I could add some vegetation to the bases, and even in the cracks in the walls, but they'll do for now.

I'm pleased with these.  The project was short (a few hours over two days) and I've produced something useful. They will work for many battle games, especially skirmish games such as Frostgrave and Lord of the Rings Strategy Battle Game.  One main factor in making them was the need for something to show ruins in my next face to face Dungeons and Dragons game.  A ruined fort features in the game, and I wanted something to indicate the outer walls.  These should do nicely.
I'll see how well 15mm minis work next to them, they may look good as the ruins of some impressive castle or something.

Sunday, 3 May 2020

Remote Roleplaying

I tend to focus on here on my painting, modelling and wargaming, but I've covered role-playing as well. I've covered my slow accumulation of monsters for Dungeons and Dragons as well as building various types of terrain and floor plans, indeed, one of my five boxes is dedicated to just such projects.

In the current climate, face to face gaming is clearly impossible outside the household, so what is the answer?
For roleplayers there are several options, and I have been experimenting with some of them with/on my Thursday night group.

The most important requirement is a good way of communicating. Text only can work, but voice is better. Images are even better, but nothing will quite beat actually sitting across from someone. There is always a slight lag, that embarrassed pause straight after someone starts speaking when they realise someone else is also talking.

For our first session, which was mostly to introduce the game and create characters, we simply used Zoom. I offered the standard array method from the Players Handbook, though I was happy for players to roll ability scores if they wished. Some did, and no super powered characters emerged, I do trust them.

For the second session we tried Roll20. This seems highly thought off, and offers a lot of functionality. It's free too, though I seemed to need the subscription to add my own maps. Players only need the free profile though.

I didn't set out to use everything the system offers; my aim was to rely on it for communication, dice rolling and showing maps. I wasn't bothered about such things as initiative tracking or lighting effects. I may investigate these in the future, but I want a good understanding of the basics first.

I created maps for the first adventure using Dundjinni, a great tool for producing maps and floorplans (you can see it being used for my sewer tiles here). Sadly its no longer commercially available, though every so often rumours spring up that it is about to be relaunched via Kickstarter. I then exported them into Roll20. Since I had to borrow a laptop for internet access, this meant copying via USB stick. I then went back and trimmed the images and reloaded them, then realised I had them in the wrong layer, so had to correct that, then I realised the maps covered too large an area for the grid, so I went back and chopped the maps into smaller sections and reloaded them again. By this stage if I hadn't had players ready and wanting to play I might have quit.

But I persevered. Initially we had problems with the sound, faint and tinny. So we used Zoom again, much better.
Unfortunately, one of the players struggled to get Roll20 to load, so had to rely on verbal descriptions. Although since I couldn't get more than the first map to load, soon everyone else was in the same boat. The dice roller proved very useful, for those who could access it.

We managed the set up plus three encounters in just over two hours; quite a bit of time was lost at the beginning.  The adventurers are just about to explore a mysterious underground ruin in search of kidnapped tribesfolk.

Before the second session, I went through the tutorial again, and felt I had a slightly better handle on how it worked.  I re-edited the maps so that each room had it's own page.  This was mostly to avoid having to worry about the 'fog of war' feature.  Even so, I started without being able to display maps other than the initial village map (created on MS Paint).  Since I can't see what the players can, I was unaware of this, but was able to correct it.  Easy, once I had figured it out.

The rest of the session went well and all players were able to access Roll20 this time.  My decision to put each room on its own page wasn't so smart.  Once the party started splitting up I had to keep switching pages.  I determined to redo the maps (again!) and experiment with the 'fog of war' for the next session, learning all the time.  The steps you take don't need to be big as long as they are in te right direction.

For the third session the redone maps worked well.  Using the fog of war was fun but I still need to work on 'pinging' and I hope to use tokens for monsters and heroes soon.

I may have started this sounding rather negative, that just represents the frustrations of coming to grips with, to me, very new technology. The actual play experience was great fun; we have now completed the first adventure, and the characters are now 2nd level, though the rogue was lucky, nearly been taken out with the instant death rule (one hit point short) after a critical hit.

Unfortunately, the characters are all now under a taboo and must ritually cleanse themselves to be able to reenter their village.  This, of course, will be the next adventure, for which they will be joined by a fourth character.

If anyone is interested, I'll do a brief post about the design decisions I made when writing the adventure, just leave a comment below.

Thursday, 23 April 2020

10mm Lord of the Rings Orc Tests

If you read my earlier post, you'll know that Merlin and I are working out a 10mm variant of Games Workshop's War of the Ring game. Of course, to play this we need minis, probably more than a few. I've picked a few up on eBay to do some practice on, and I'm happy with my Gondorians (here). Now I've started work on the 10mm orcs I already possess.

If you know the Copplestone Castings range you know they mostly come in strips of 5s. I've done some separating to enable me to keep to the eight infantry to a base used in War of the Ring. It doesn't really matter, we won't be removing individual minis to mark casualties, but more importantly, every four purchased companies get me a free one.

As you may know, I like my orcs to have a mix of skin tones (check out my Dragon Rampant orcs here). Tolkien describes orc flesh as, variously, sallow or swarthy. Some even as black. So this company is a test to see what colours work.


So I remember what I was doing here, there are four different skin colours and two different washes (Army Painter Soft Tone and Strong Tone).
The skin tones are Vallejo Game Colour Heavy Charcoal highlighted with VGC Cold Grey, VGC Heavy Grey highlighted with VGC Rotting Flesh, VGC Cold Grey highlighted with VGC Stonewall Grey and VGC Desert Yellow highlighted with VGC Moon Yellow.
Metals were VGC Gunmetal Metal, washed with black and tunics were the undercoat, Vallejo German Green Brown Surface Primer, highlighted with VGC Khaki.
My Gondorians use Desert Yellow as the base coat for wooden items, so I went with the darker VGC Leather Brown.

I'm pretty pleased with the results, and a quick ask for feedback on the Wargamming in Middle Earth FB group was positive. I still want to try some more tans and browns though, so I may well do a second test company.  I'll also not try to have quite so much variation in one company, its not United Colors of Mordor. As for the was, I might go half and half, as neither quite do what I want.

Wednesday, 15 April 2020

Star Saga Bosses

I've finished all the Star Saga minis, just the furniture and doors to complete.
So far I've shown two of the bosses, but I thought I'd do a post with all five of them.

First, a group photo of all five bosses.

Guard Commander Graves, Data Storage Unit X-02-A, Dr Lucas Koyner, Plague Aberration and Monarch

Monarch the Enforcer

Monarch is a lovely model and one I really enjoyed painting. Over a black undercoat I did a heavy drybrush of Vallejo Game Colour Sombre Grey, then a highlight lightening the grey with Wolf Grey. The final highlight was applied to the edges of the armour plates. Selected plates were then washed with blue wash, though the effect doesn't show very well on the photos. I could easily go back to this model to bring out more details, but it will do for now.

Dr. Koyner

Koyner was essentially painted like the Lab Technicians, since I didn't cover the process when I posted them here, this is the process. Over a white under coat, the Lab suit was painted VGC Wolf Grey. White (VGC Dead White) was used to give heavy highlights then a wash of VGC Pale Grey Wash. The yellow patches were VGC Heavy Gold Brown highlighted with VGC Gold Yellow. Rather like the Chovar here, I struggled to know how to paint the various cables and stuff for his extra cybernetic arms. The end result of various greys and metals doesn't look great, but again, it'll do.


And finally the Plague Aberration

This model was originally made for Deadzone, and I've faced T'OtherOne's Abomination on more than one occasion. Nasty. 
In Star Saga it's presence is tied nicely into the story. I believe the model was added as a stretch goal, with a mission written to include it.

I painted it so it was obviously connected to the Plague Victims here. The bony growths were done essentially the same, but the flesh was given a base coat of VGC Heavy Grey (which has quite a greenish shade to it) followed by a drybrush of a mix of the basecoat and VGC Rotting Flesh, then pure Rotting Flesh, then a final highlight mixing in some VGC Livery Green.
The whole model was given a wash of Army Painter Soft Tone. Extreme highlights were retouched once the wash was dry.
I then added patches of Strong Tone wash and Red wash to give a more bruised flesh look, though not as heavily as I might have done.
I'm pleased with the end result, but I suspect it will look quite different to my Plague Deadzone faction.

That's a set of minis I'm pleased with. I enjoyed painting some of them much more than others, but now I can play the Eiras Contract with fully painted minis. Well, I've still to finish the furniture and the doors, and there are the laser guns and shield generators still to do. The shields are fiddly and easily lost, so I may well base them somehow.

Of course, I haven't started any of the extra Mercenaries. Or anything from the supplements...

Tuesday, 14 April 2020

Kings of War, Orcs vs Forces of the Abyss

Earlier this year I got a couple of short games in against Andy. He used his Forces of the Abyss and I used my Orcs. It's been quite some time since the actual games, so I'll not try and give a full commentary.

We first played a 500 point game, it was Andy's first go at the new edition, so we started small. He quickly got the hang of things and demonstrated a good working knowledge of his forces. In short order he cleared the table of my orcs.

Andy's nicely painted and based Gargoyles.

Abyssal Harbinger, Flamebearers and Succubi

Tortured Souls.

My orcs. Gore Riders, Greatax, Krusher and Ax.

It starts off well for the orcs as the infantry advance while the riders attempt to swing round the flank


But good use of the Flamebearers, and sacrificing the Tortured Souls (surely that's what they are for) to slow down the Gore Riders, helps the Abyssals to eventual victory.

The battlefield at the end of the game.

Next we played a 1000 point game. Time for revenge I thought (mistakenly).

Andy brought more stuff, including these Hellhounds,

Chroneas,

and some Molochs


My orcs did better, and if we'd played the new rules for characters right (Yielding misunderstandings), I might have scraped a draw, although not a win. But still, the Forces of the Abyss triumphed again.

Two very good fun games. Andy's Abyssals are looking good, or should that be evil? He is still working on them, but the gargoyles (nasty annoying pests) show what the whole army will look like once he has finished basing and painting.

Saturday, 11 April 2020

A New Project - War of the Ring in 10mm

Like most hobbyists I like shiny new projects. I frequently have to reign in my enthusiasm for new games or armies, and its not easy. I think I'm getting better at it, and organising my painting using the five box system has helped massively, but sometimes I have to give in.

I've long been a big fan of Professor Tolkien's work. In fact my first collection of minis (apart from plastic Airfix) was the old Minifigs Mythical Earth range. I painted them up with Humbrol enamels and used a set of rules called Wizards and Warfare, essentially a Lord of the Rings variant of whatever edition rules Wargames Research Group were up to in the 1970s.

I don't think I ever really grokked those rules. I was having to work them out myself with a largely uninterested opponent in my neighbour. One day I'll revisit them, though I'm not confident they've aged well.

The minis eventually saw more use in my early Dungeons and Dragons games in the late 80s* and I didn't return to wargaming until I tried Warhammer second edition a few years later. But I always wanted to play large scale battles based on the ones in The Lord of the Rings and The Silmarillion. None of the rules I tried really gave the right feel.

If you've read much of this blog, you should know I like Games Workshop's Strategy Battle Game, but that doesn't really cover mass battles. When GW published War of the Ring I tried that, and it nearly worked. Where I felt it fell down was the over emphasis (in my opinion) on even quite minor characters, the space required for the truly big battles, and, of course, the cost of assembling the suitably huge armies.

I've been aware of Copplestone Castings range of 'not Middle Earth' 10mm minis, along with a few other companies producing more generic 10mm fantasy (I've even included some of Kallistra's Mountain Orcs in my 15mm Dragon Rampant force). I wondered if I could assemble Middle Earth armies in 10mm, thus addressing the space and cost issues, and use the War of the Ring rules, but simplify them and take out some of the hero related rules.

None of this would be of any use if I was doing this on my own, but a quick email to Merlin suggested I would have at least one very keen opponent. So, this is my, or rather our, new project. 10mm War of the Ring. Now all we need to do is decide which rules to keep, which to change, and which to get rid of.

Oh, and an army to paint.

Or two.

Or more.

And some terrain.

*I wish I still had them. Partly for nostalgia, they are still my go to image for many of the inhabitants of Middle Earth, rather than Peter Jackson's blockbuster films, but some of the sculpts, though crude by today's standards, were inspired. The bow-legged orcs, I think, look exactly right.

Thursday, 9 April 2020

A Bit About The Current Situation

You may have noticed an increase in output recently. No surprise, like many I find I have a lot more free time. My hobby and my music are helping keep me sane (for a given value of sane).

There are other reasons as well though. I'm starting to get the hang of combining phone for photos and tablet for text, and as several projects near convenient pause points, I think I do have something to show.

It might get a little dull at home, but I have family who are front line workers, and it's obviously a nightmare for everyone working in that sector.

Stay safe everyone.

Wildspire Miniatures for Dungeons and Dragons

Whilst assembling the minis required for the Master Forge I looked at what is available these days beyond the usual Reaper or Wizkids.   I ...